
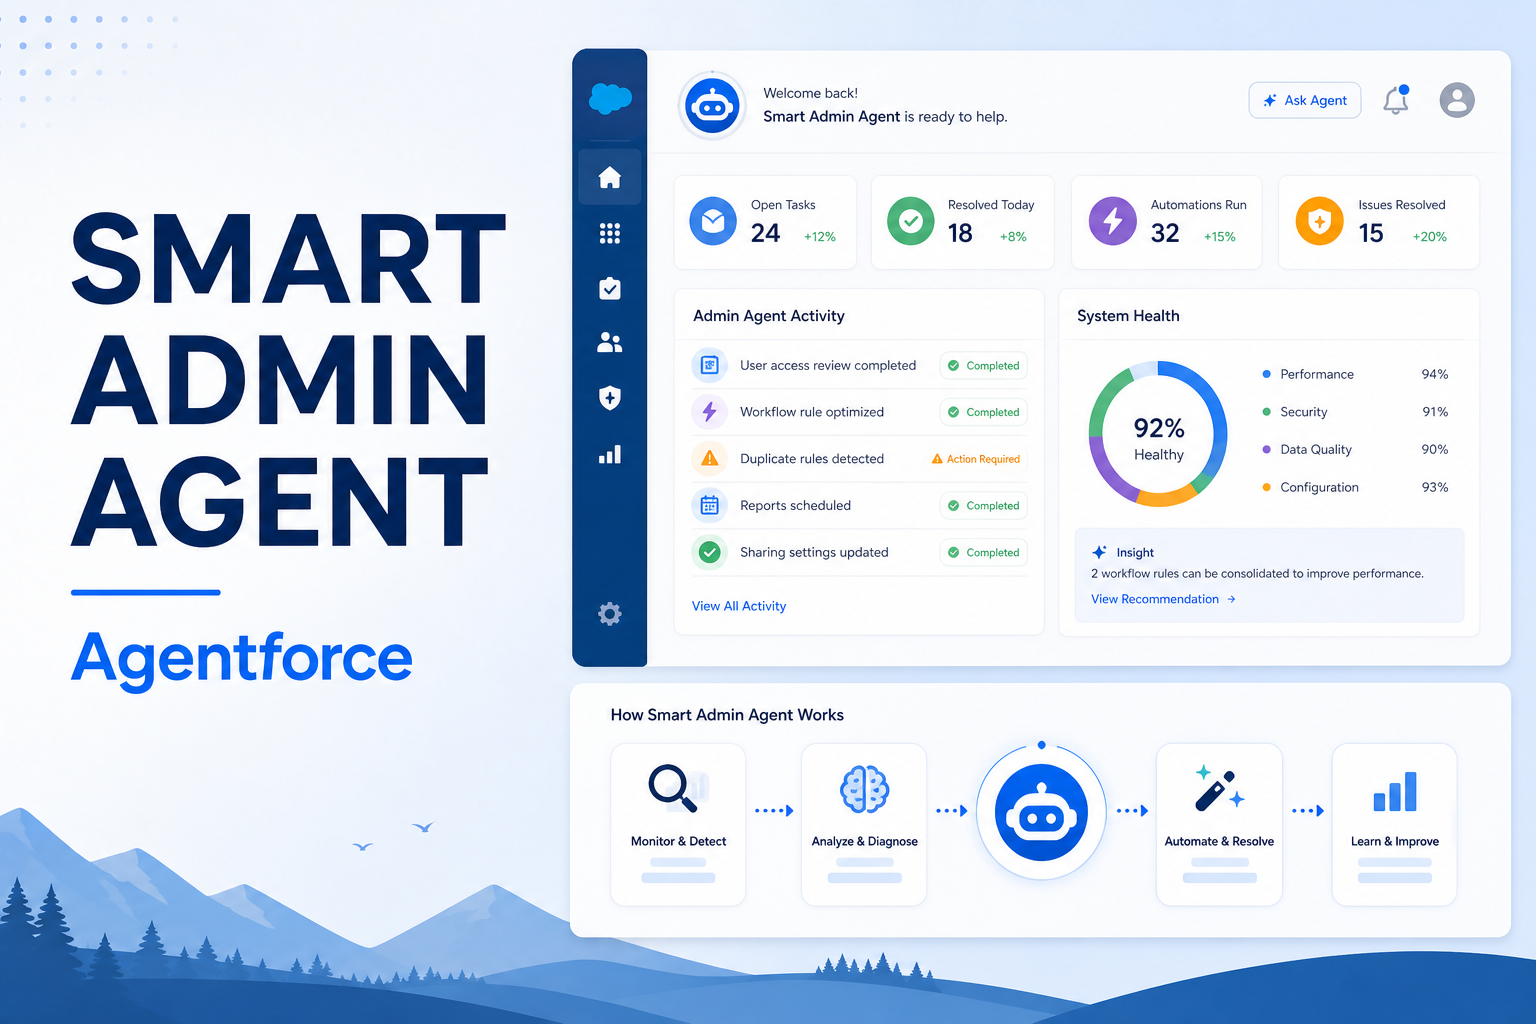
SMART ADMIN AGENT
Design an intelligent Salesforce admin assistant to automate administrative tasks, troubleshooting, and productivity workflows.
Salesforce Developer
1. Abstract
The Smart Admin Agent is an intelligent automation solution built on the Agentforce platform. It addresses the growing complexity of Salesforce user lifecycle management by providing a conversational, bot-driven interface for administrators and support agents.
Traditional user administration tasks — creating users, assigning permissions, managing groups, and controlling access — often require navigating multiple Salesforce screens and performing repetitive manual steps. The Smart Admin Agent consolidates all of these operations into a single guided interface powered by Agentforce automation.
The primary objective of this solution is to:
- Accelerate user onboarding by automating the end-to-end setup process.
- Streamline permission management with intuitive, input-driven flows.
- Reduce administrative overhead and minimise human error.
- Enable non-technical admins to perform complex operations through simple prompts.
- Enhance security compliance through precise, controlled access assignment.
2. Solution
The Smart Admin Agent leverages Agentforce's conversational AI capabilities to automate and orchestrate Salesforce administrative tasks. The solution is divided into several functional modules, each addressing a distinct area of user and permission management.
2.1 — Automated User Setup & Lifecycle Controls
The agent simplifies user management by automatically creating users, assigning permission sets, and grouping them with permission set groups for faster onboarding. Admins can freeze, deactivate, or reset passwords quickly using guided flows powered by Agentforce.
2.2 — Seamless Permission Management
Admins can assign permission sets directly to users and permission set groups, and manage object-level access and custom permissions with ease. The solution also supports dynamic updates to permission set and permission set group names.
2.3 — Public Group Configuration
The agent enables creation of public groups and assignment of users to those groups, streamlining access management in collaborative environments. Teams can be organised efficiently without any manual Salesforce configuration.
2.4 — Custom Permission Assignment
Admins can assign custom permissions to permission set groups using their API names as input identifiers, ensuring precise access control and enhanced security compliance.
2.5 — Smart Automation & Input Handling
The Agentforce bot accepts structured inputs and auto-generates the required components — users, permissions, and group memberships — making the tool highly efficient for both admins and support agents.
2.6 — Data Export
Salesforce user data can be exported by providing a comma-separated list of field names. The agent generates an Excel file with a download link, allowing the admin to view and save the data immediately.
2.7 — Debug Log Creation
Admins can create debug logs for specific users simply by supplying the username. This supports troubleshooting and monitoring of user activity within the Salesforce org.
3. Agentforce Features
The Smart Admin Agent supports the following fifteen capabilities through the Agentforce platform:
| # | Capability |
|---|---|
| 1 | Create a user |
| 2 | Create a debug log for a user |
| 3 | Export data |
| 4 | Freeze, deactivate, and reset user passwords |
| 5 | Create a Public Group |
| 6 | Assign public group membership to a user |
| 7 | Create a Permission Set |
| 8 | Create a Permission Set Group |
| 9 | Update Permission Set, Permission Set Group, and Profile name |
| 10 | Assign Permission Set to a user |
| 11 | Assign Permission Set Group to a user |
| 12 | Assign Permission Set to a Permission Set Group |
| 13 | Add a user to a Public Group |
| 14 | Assign custom permission to a Permission Set Group |
| 15 | Update and Create Permission Set object access |
4. Step-by-Step Guide
This section provides detailed instructions for each feature of the Smart Admin Agent. Follow the steps below to reproduce each operation using the Agentforce bot.
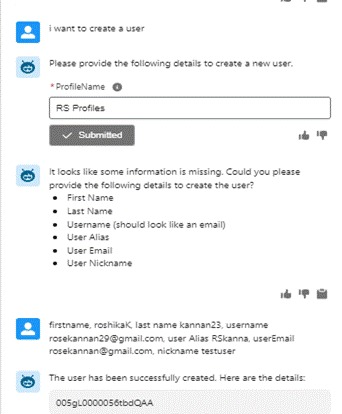
4.1 User Creation
When creating a user via the Agentforce bot, all six fields listed below are required. The bot will validate the inputs before proceeding.
| Field | Description |
|---|---|
| First Name | The user's given name |
| Last Name | The user's family name |
| Alias | A short identifier (max 8 characters) |
| Username | Must be in email format and globally unique |
| The user's email address for notifications | |
| Profile | The Salesforce profile to assign (e.g. Standard User) |
Steps:
- Open the Agentforce Smart Admin Agent in Salesforce.
- Provide all six required fields: First Name, Last Name, Alias, Username, Email, and Profile.
- The bot validates the inputs and automatically creates the user record.
- On success, the bot responds with a confirmation message and the generated User ID.
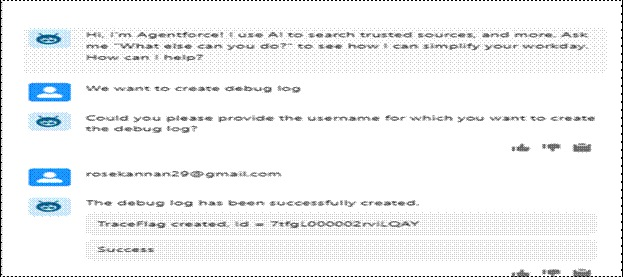
4.2 Debug Log Creation
Debug logs are useful for monitoring and troubleshooting user-specific activity within the org.
Steps:
- Provide the Username of the user for whom the debug log is required.
- The Agentforce bot creates the Debug Log automatically.
- A confirmation message is displayed once the log has been created.
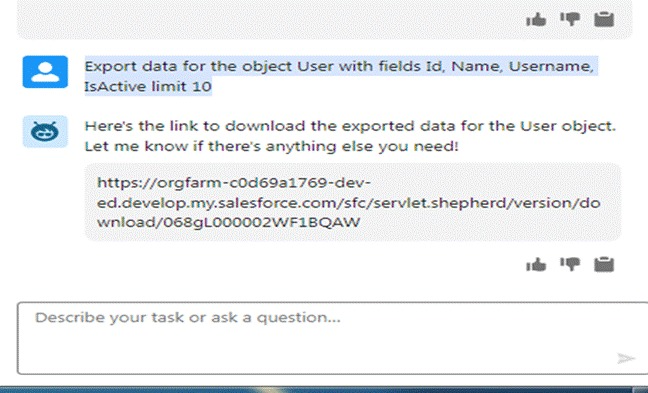
4.3 Data Export
The bot exports data in Excel (.xlsx) format and generates a temporary download link.
Steps:
- Provide the fields to export as a comma-separated list, for example: Id, Name, Username, IsActive.
- The bot processes the request and exports the matching Salesforce records.
- A download link is generated for the Excel file.
- Click the link to open and save the exported data.
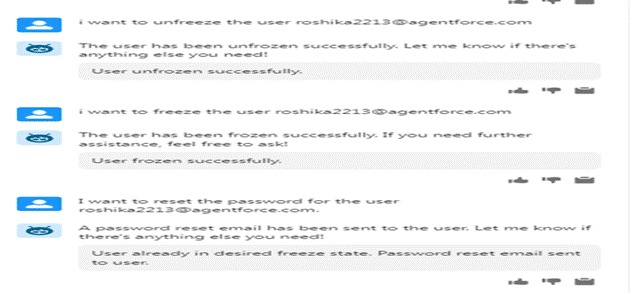
4.4 Freeze, Unfreeze & Reset Password
All three actions — freeze, unfreeze, and password reset — are triggered using the user's Username.
Steps:
- Provide the Username of the target user.
- Specify the action: freeze the account, unfreeze it, or reset the password.
- For password reset, the system automatically sends an email to the user's registered address.
- The bot confirms the action with a status message.
4.5 Public Group Creation & User Assignment
Steps:
- Provide the Public Group Name to create a new group.
- The bot creates the group in Salesforce.
- Provide the Username of the user to be added to the group.
- The bot assigns the user as a member and confirms the assignment.
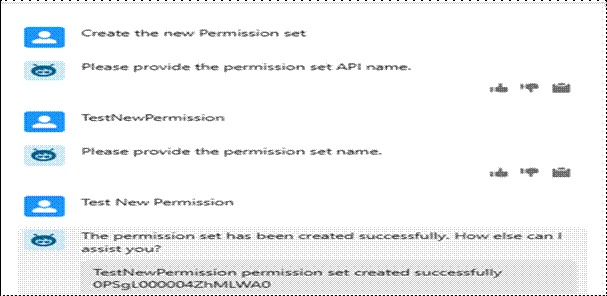
4.6 Permission Set Creation
| Field | Description |
|---|---|
| Permission Set API Name | The developer / API name (no spaces) |
| Permission Set Name | The display label shown in Salesforce |
Steps:
- Provide the Permission Set API Name.
- Provide the Permission Set Name (Label).
- The bot creates the Permission Set and returns a confirmation with the new record ID.
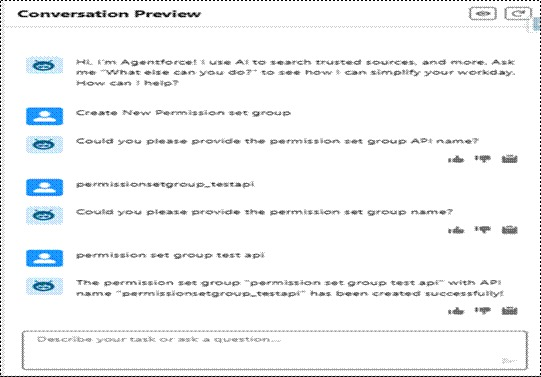
4.7 Permission Set Group Creation
| Field | Description |
|---|---|
| Permission Set Group API Name | The developer / API name (no spaces) |
| Permission Set Group Name | The display label shown in Salesforce |
Steps:
- Provide the Permission Set Group API Name.
- Provide the Permission Set Group Name (Label).
- The bot creates the Permission Set Group and confirms successful creation.
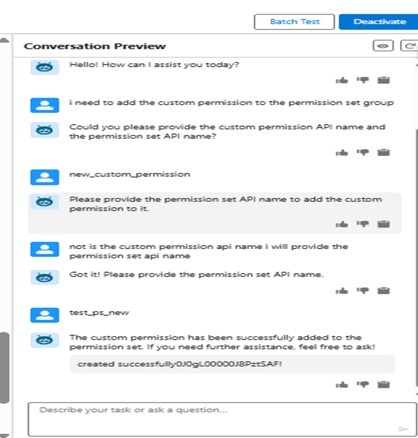
4.8 Add Custom Permission to a Permission Set
Steps:
- Provide the Custom Permission API Name of an existing custom permission.
- Provide the Permission Set API Name of an existing permission set.
- The bot adds the custom permission to the specified permission set and confirms.
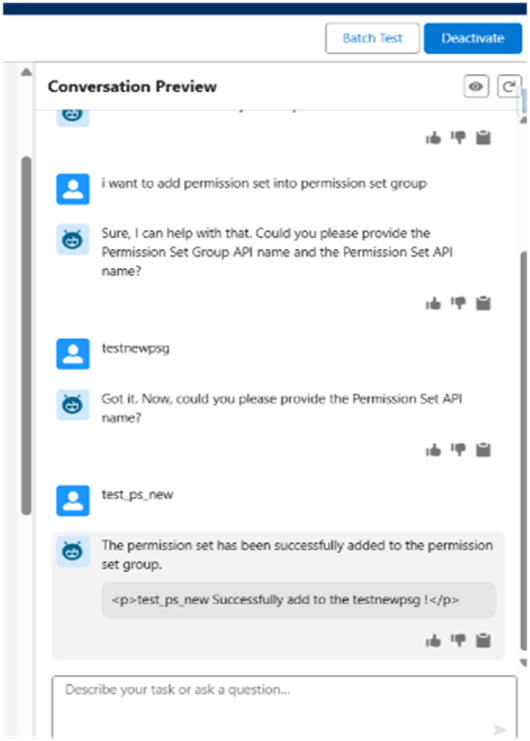
4.9 Add Permission Set to a Permission Set Group
Steps:
- Provide the Permission Set API Name.
- Provide the Permission Set Group API Name.
- The bot assigns the permission set to the group and confirms the action.
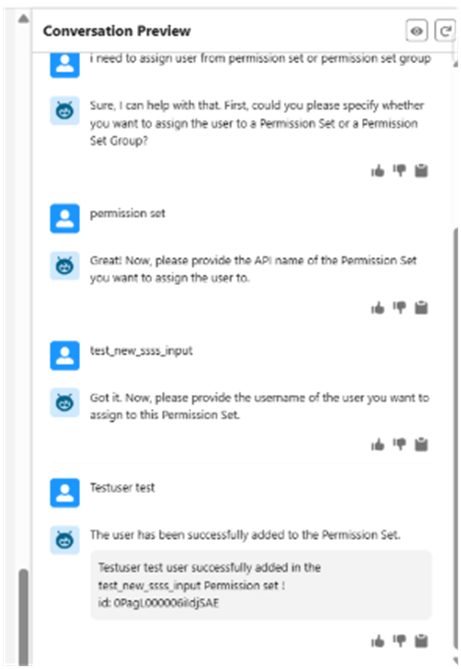
4.10 Add User to a Permission Set
Steps:
- Provide the Username of an existing user.
- Provide the Permission Set API Name.
- The bot creates the assignment and confirms the action.
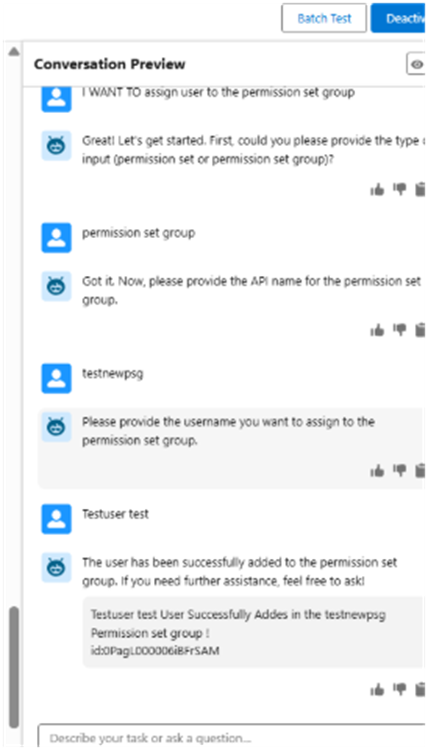
4.11 Add User to a Permission Set Group
Steps:
- Provide the Username of an existing user.
- Provide the Permission Set Group API Name.
- The bot creates the group assignment and confirms the action.
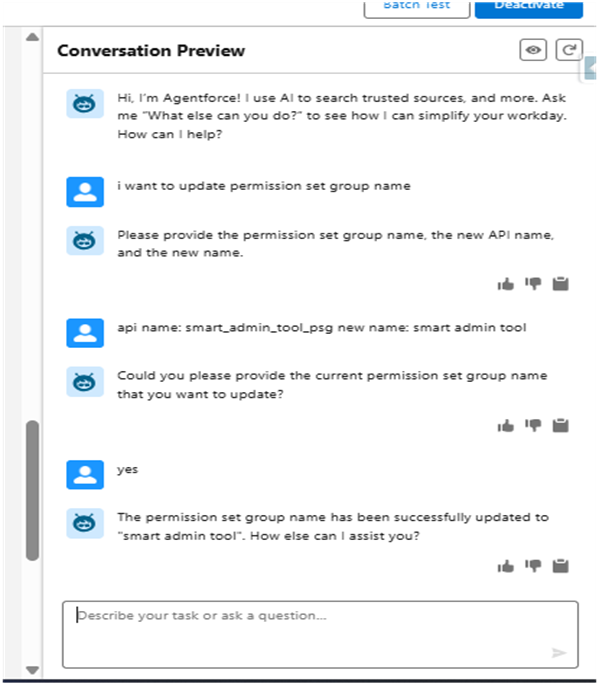
4.12 Update Permission Set or Permission Set Group Name
Steps:
- Specify whether you are updating a Permission Set or a Permission Set Group.
- Provide the API Name of the record to be updated.
- Provide the new Name (label) to apply.
- The bot updates the label and confirms the change.
4.13 Create and Update Permission Set Object Access
| Field | Description |
|---|---|
| Permission Set API Name | The API name of the permission set to modify |
| Object Name | The Salesforce object API name (e.g. Account, Contact) |
| Read Access | True – grant Read / False – revoke Read |
| Edit Access | True – grant Edit / False – revoke Edit |
| Create Access | True – grant Create / False – revoke Create |
| Delete Access | True – grant Delete / False – revoke Delete |
Steps:
- Provide the Permission Set API Name.
- Provide the Object Name (Salesforce object API name).
- Specify each access level — Read, Edit, Create, and Delete — as True or False.
- The bot creates or updates the object permission entry and confirms success.
5. Demo
A live demonstration of the Smart Admin Agent is available at the link below. The recording covers the full end-to-end workflow: user creation, permission management, group assignment, and data export.
Demo Video: https://www.awesomescreenshot.com/video/42890036?key=9269fce726a387bfbc921cdd13d2a5d0
6. Conclusion
The Smart Admin Agent marks a significant step forward in Salesforce administration efficiency. By harnessing conversational AI through the Agentforce platform, it allows administrators to execute complex, multi-step operations through straightforward guided prompts — without deep technical knowledge of Salesforce internals.
The solution reduces the time and effort required for user lifecycle management, permission configuration, and access control, while also improving accuracy and auditability across the board.
Advantages
- Faster onboarding — automated user creation and permission assignment cuts setup time significantly.
- Fewer errors — structured input validation ensures accurate configuration on every run.
- Accessible to all — non-technical admins can perform advanced tasks without Salesforce expertise.
- Single interface — all administrative tasks are reachable from one conversational bot.
- Stronger compliance — precise permission and custom-access controls reduce security risk.
- Data visibility — built-in export gives instant access to user records in Excel format.
- Auditability — debug log creation supports monitoring and troubleshooting.
Limitations
- Input accuracy — incorrect API names or usernames will cause the operation to fail; the bot relies on correct inputs.
- Agentforce licence required — the solution needs the Agentforce platform to be enabled and configured in the org.
- Scope — currently focused on user and permission management; other metadata operations are out of scope.
- Single-record operations — bulk user creation or mass permission updates require additional configuration.