
Configuring Agentforce on a B2B Commerce Community Page
Step-by-step guide to integrating and configuring Agentforce within a Salesforce B2B Commerce Experience Cloud site.
Salesforce Developer
1. Abstract
If you've been exploring Agentforce and wondering how to bring that AI-powered conversational experience directly into your Salesforce B2B Commerce storefront, this article is for you. The goal here is simple — deploy an Agentforce AI agent inside an Experience Cloud community page so that your buyers can get instant, intelligent support right while they're browsing products or placing orders.
But it's not just about dropping a chat widget on a page. The real value comes when the agent actually knows who it's talking to — which buyer, which account, which product they're looking at — without making the customer repeat themselves. To achieve that, we need to wire up the messaging channel to pass the logged-in user's Salesforce IDs directly to the agent at the moment the chat opens.
In this article, we'll walk through the full setup — from assigning the right permission sets, creating an Embedded Service Deployment, configuring the ESA Messaging Channel, setting up Omni-Flow routing.
2. Solution
The approach we're using is built entirely on Salesforce's native stack — no third-party tools, no custom code for the core setup. Here's how the pieces fit together:
- Agentforce Service Agent sits at the core. It's an AI agent configured with topics and actions that define what it can help customers with — order lookups, product questions, account details, and more.
- Embedded Service (WebV2 — Enhanced Chat) is the deployment mechanism. It packages the chat interface and makes it available as a component that can be dropped into any Experience Builder page.
- The Messaging Channel (ESA Channel) is the bridge between the chat interface and the Agentforce agent. This is where we define the routing logic, fallback behaviour, and — crucially — the custom parameters that pass user context.
- Omni-Flow Routing is how conversations get directed to the AI agent. A flow called "Route to ESA" handles the routing logic, with a fallback queue ready in case human escalation is needed.
3. Step-by-Step Guide
Step 1 — Assign the Required Permission Sets
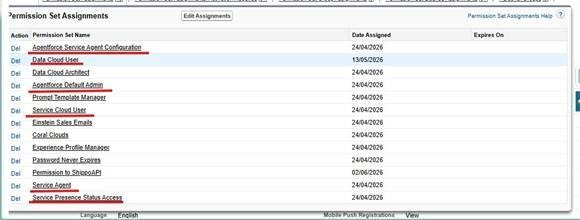
Before anything else, make sure the admin user has the right permissions. Agentforce touches multiple Salesforce products — Service Cloud, Data Cloud, Einstein, and Experience Cloud — so you'll need a specific set of permission sets in place. Without these, certain setup options simply won't appear, and the agent won't be able to run.
Navigate to Setup > Users, open the admin user record, and go to Permission Set Assignments. Add the following permission sets:
- Agentforce Service Agent Configuration — gives access to the Agentforce setup screens
- Agentforce Default Admin — allows full management of agents
- Service Agent — grants the runtime permissions the agent needs to operate
- Service Cloud User — enables Service Cloud features required for messaging
- Service Presence Status Access — needed for Omni-Channel presence and routing
- Data Cloud User and Data Cloud Architect — required if using Data Cloud for agent context
- Prompt Template Manager — allows managing AI prompt templates used by the agent
- Experience Profile Manager — needed for managing community user profiles
Step 2 — Create the Embedded Service Deployment
The Embedded Service Deployment is what packages your chat widget for the web. Think of it as the container that holds the chat interface before it gets placed on your community page.
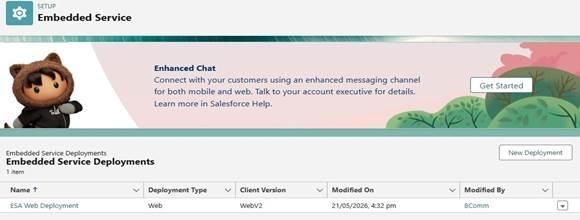
Go to Setup and search for Embedded Service in Quick Find. Click New Deployment and choose the following:
- Deployment Type: select Web
- Client Version: make sure this is set to WebV2 — this is essential. WebV1 does not support Agentforce AI agents
- Give it a clear name — in our case, we used ESA Web Deployment
Once saved, the deployment will appear in the Embedded Service Deployments list. You'll come back here later to grab the deployment code snippet when embedding it on the community page.
Step 3 — Configure the Messaging Channel
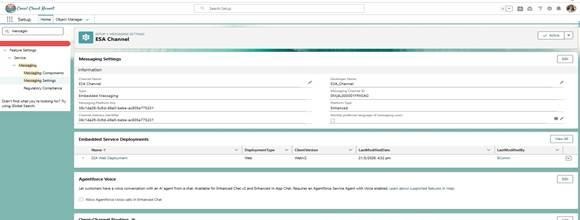
This is where things get interesting. The Messaging Channel is the control centre for your Agentforce deployment — it connects the Embedded Service deployment to the agent, defines routing, and holds the custom parameters we'll set up in the next steps.
Go to Setup > Messaging Settings > New Channel and configure it as follows:
- Channel Name: ESA Channel (or whatever name makes sense for your org)
- Developer Name: ESA_Channel
- Type: Embedded Messaging
- Platform Type: Enhanced
Under the Embedded Service Deployments section, link the ESA Web Deployment we created in Step 2. Once linked, the channel will display the deployment details including the Messaging Platform Key and Channel ID — keep note of these as they'll be used in the deployment code.
Step 4 — Set Up Omni-Flow Routing
Now we need to tell Salesforce where to send the conversations that come in through the chat widget. We're using Omni-Flow routing, which gives us the flexibility to direct conversations to the Agentforce AI agent through a flow, with a human-agent fallback if needed.
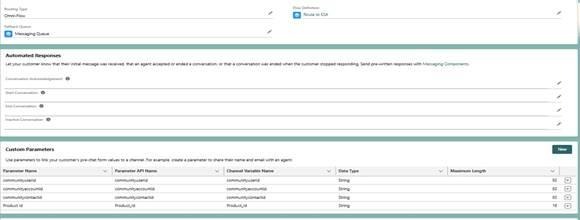
Still in the ESA Channel settings, scroll down to the Omni-Channel Routing section and set:
- Routing Type: Omni-Flow
- Flow Definition: Route to ESA — this is the flow that handles directing conversations to the Agentforce agent.
- Fallback Queue: Messaging Queue — this is where conversations go if the agent can't resolve the issue or the customer requests a human
While you're in this section, you'll also notice the Automated Responses area. This is where you can configure pre-written messages for key moments in a conversation — like when a customer's message is first received, when the agent accepts the chat, or when the conversation ends. These are optional but they significantly improve the customer experience.
Step 5 — Embed the Agent on the Community Page
With the channel fully configured, the last step is placing the chat widget on your B2B Commerce community page.
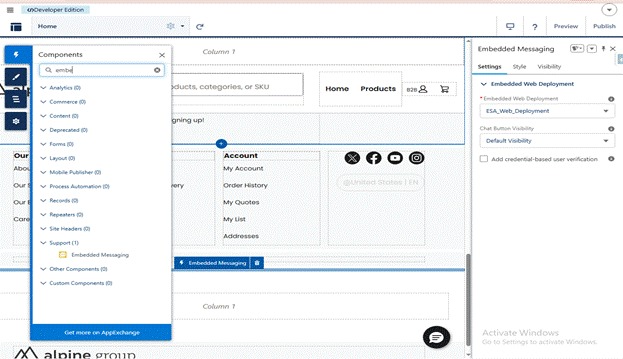
Open Experience Builder for your B2B Commerce site. In the Components panel, search for Embedded Messaging and drag the component onto the page or, better yet, add it to your global header or footer template so it appears on every page of the site.
In the component's properties panel, select the ESA Channel you configured. The widget will automatically use the deployment and parameter settings you've already defined.
When you're happy with the placement, click Publish. The chat bubble will now appear on your live community site, and the Agentforce agent will be ready to assist your buyers.
4. Conclusion
Setting up Agentforce on a B2B Commerce community page is genuinely one of those configurations that delivers a lot of value once it's working. The combination of AI-powered responses, context-aware conversations, and seamless escalation to human agents creates an experience that feels modern and helpful rather than frustrating.
Pros
- Fully native Salesforce — no third-party tools or custom code needed
- Omni-Flow routing gives you flexibility to handle complex routing logic
- Seamless fallback to human agents via the Messaging Queue
- One-time setup — the widget appears org-wide once added to the global template
- Easy to extend with additional topics, actions as needs grow
Cons
- Requires multiple licences (Agentforce, Service Cloud, Data Cloud) — cost can add up
- WebV2 (Enhanced Chat) must be provisioned — not always available by default
- Omni-Flow routing adds a layer of complexity that needs flow maintenance
- Guest users need additional configuration and cannot access account-specific data
Overall, this is a setup worth investing the time in. Once everything is wired up correctly, you have an AI agent on your storefront that knows your customers, understands your products, and can handle a wide range of support queries — all without a human needing to be involved for every interaction.