
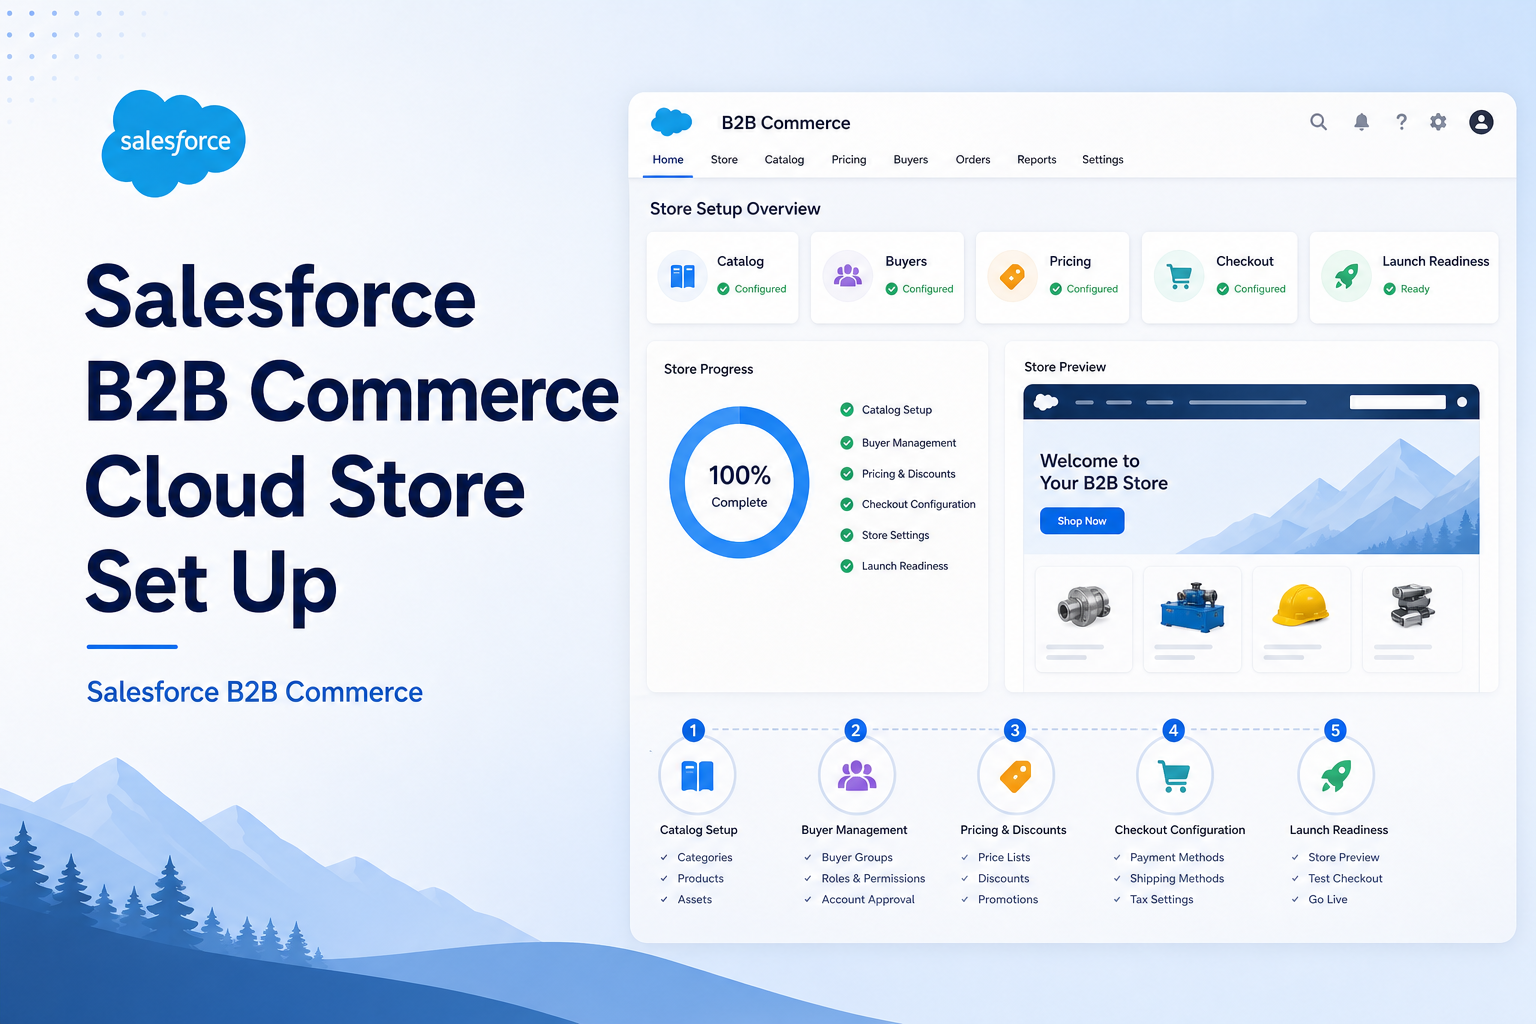
Salesforce B2B Commerce Cloud Store Set Up
A complete guide to configuring and launching a Salesforce B2B Commerce Cloud storefront from scratch.
Salesforce Developer
Abstract
Salesforce B2B Commerce enables organizations to provide a digital storefront for business customers, allowing them to browse products, manage carts, place orders, and track purchases online.
The objective of this setup is to configure the Salesforce environment and enable all required B2B Commerce features, including Experience Cloud, Commerce Settings, Order Management prerequisites, Buyer Management, Permission Sets, and Storefront configurations.
This document provides a step-by-step guide to configure a Salesforce org for B2B Commerce implementation.
Solution
To successfully configure Salesforce B2B Commerce, several platform features must be enabled and configured in the correct sequence.
The overall solution includes:
- Enabling Experience Cloud
- Activating Commerce Features
- Configuring Order Settings
- Assigning User Roles
- Setting Organization-Wide Defaults
- Optimizing Page Layouts
- Running Commerce Setup Assistant
- Configuring Buyer Information Components
- Assigning Buyer Permissions
- Installing Commerce Reports and Dashboards
These configurations collectively establish the foundation required for creating storefronts, managing buyers, maintaining product catalogs, and processing orders.
Step-by-Step Solution for Store Configuration
Step 1: Sign Up for a Developer Edition
Follow this link: https://developer.salesforce.com/signup
Step 2: Enable Experience Cloud
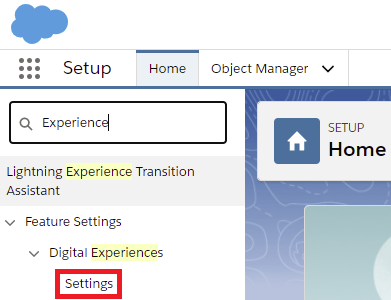
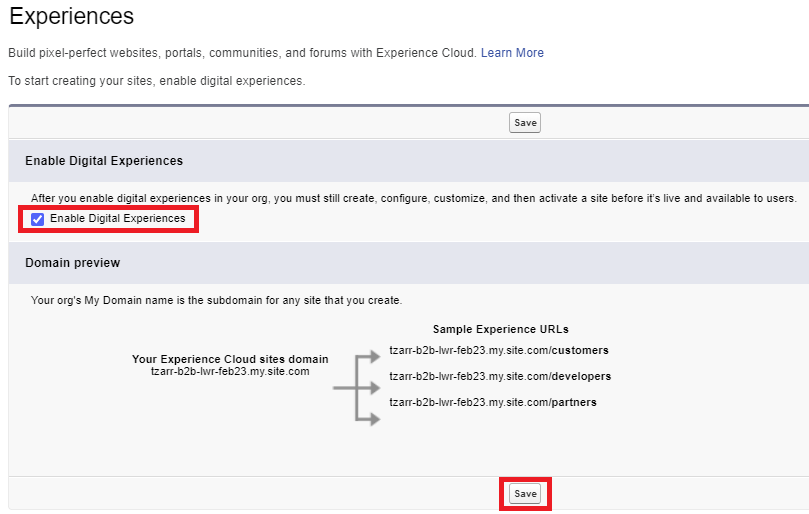
- Go to Setup (Click Home Tab) → Digital Experiences → Settings.
- Check (enable) the Enable Digital Experiences checkbox.
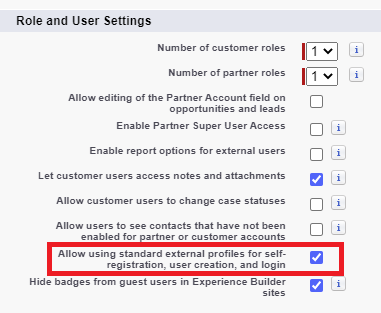
- From Setup → Digital Experiences → Settings, choose to allow using standard external profiles for self-registration, user creation, and login, then click Save.
Step 3: Enable Commerce Features
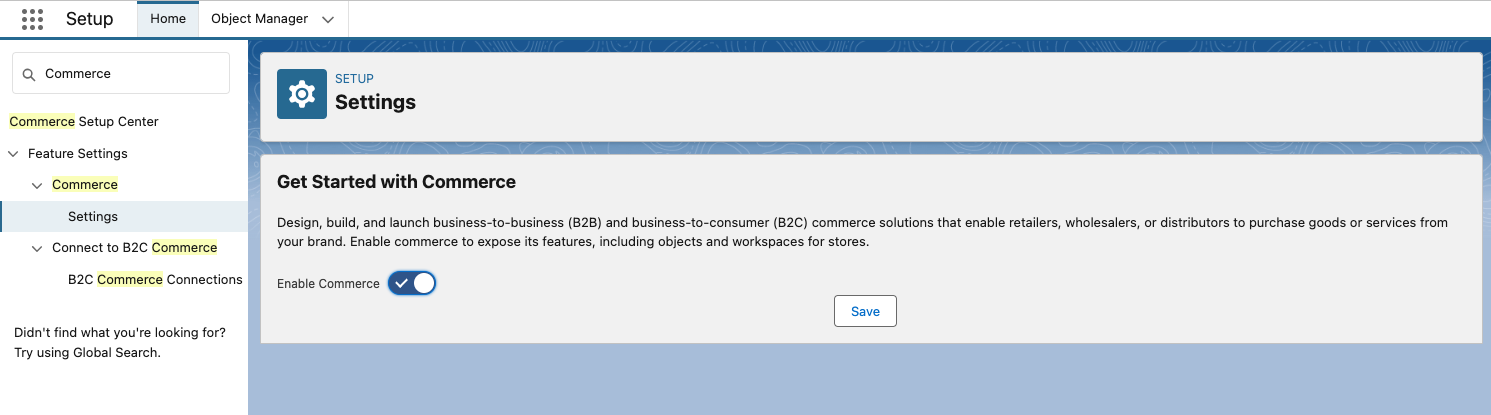
- Go to Setup → Quick Find: Commerce → Settings. Click the Enable Commerce Toggle and click Save.
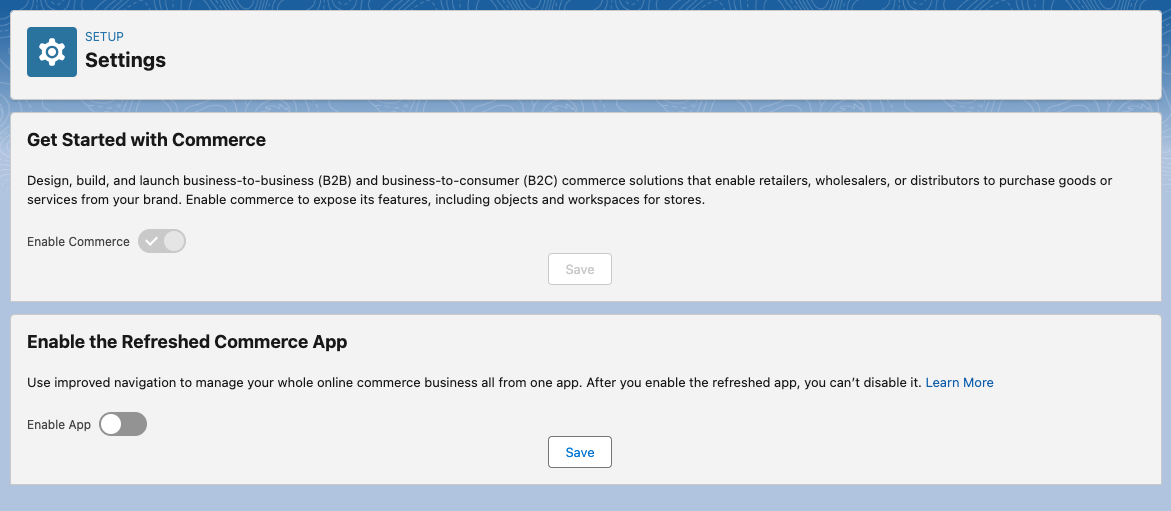
- After enabling Commerce, you will see another section titled "Enable the Refreshed Commerce App" — click Save.
Step 4: Enable Order Preferences
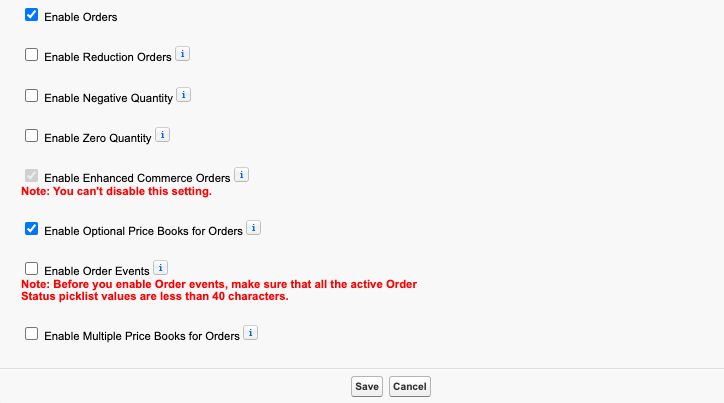
- From Setup, reach Order Settings and choose Enable Enhanced Ecommerce Orders. Choose the other 2 options as indicated. Click Save.
Step 5: Enable & Activate CMS
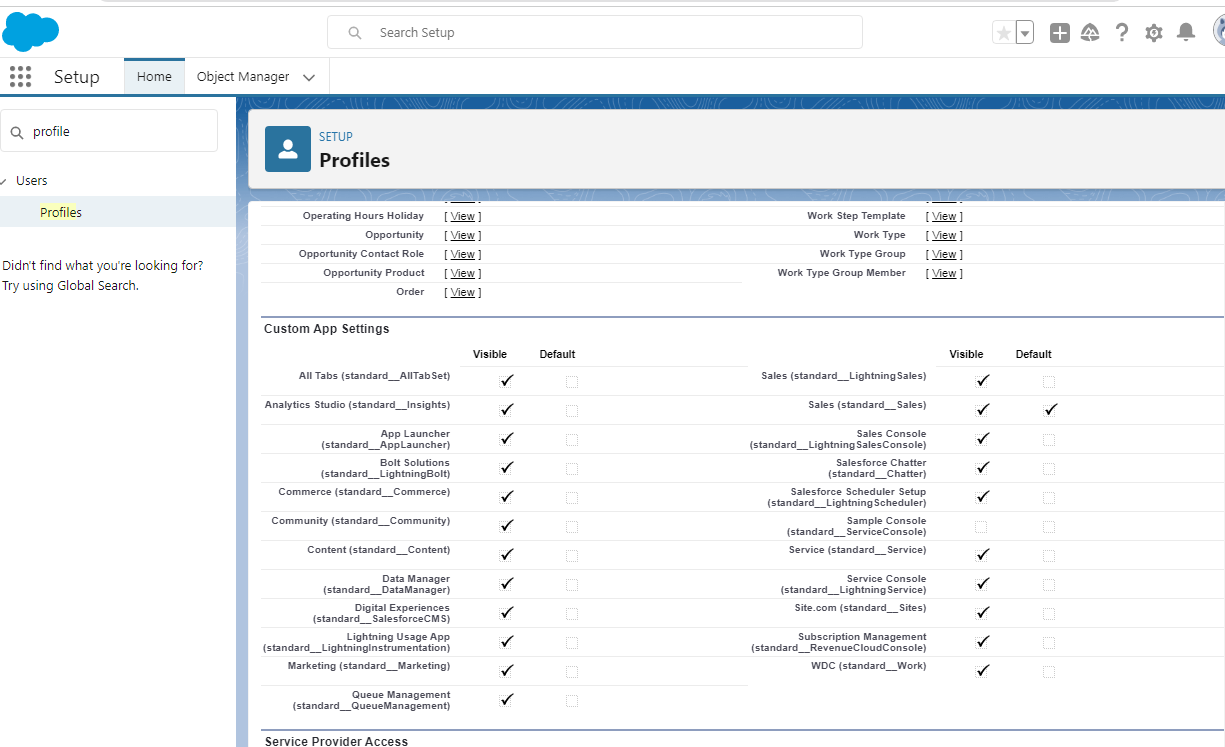
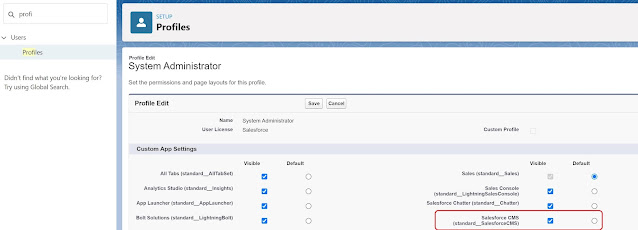
- In Settings, go to Profile → System Administrator. Edit the System Administrator profile and choose Salesforce CMS at the Custom App Settings section.
- Go to the Tab Settings section and make the following tabs Default On for these 2 CMS items:
- CMS Channels
- CMS Workspaces
- Make the following tabs Default On as well (Tab settings):
- Commerce Setup
- Buyer Group Price Book
- Buyer Groups
- Catalogues
- Categories
- Entitlement Policies
- Guest Buyer Profile
- Price Adjustment Schedules
- Pricing Workspace
- Store Price Book
- Store
- Order Summaries
Step 6: Optimize Page Layouts
Update Product Page Layout
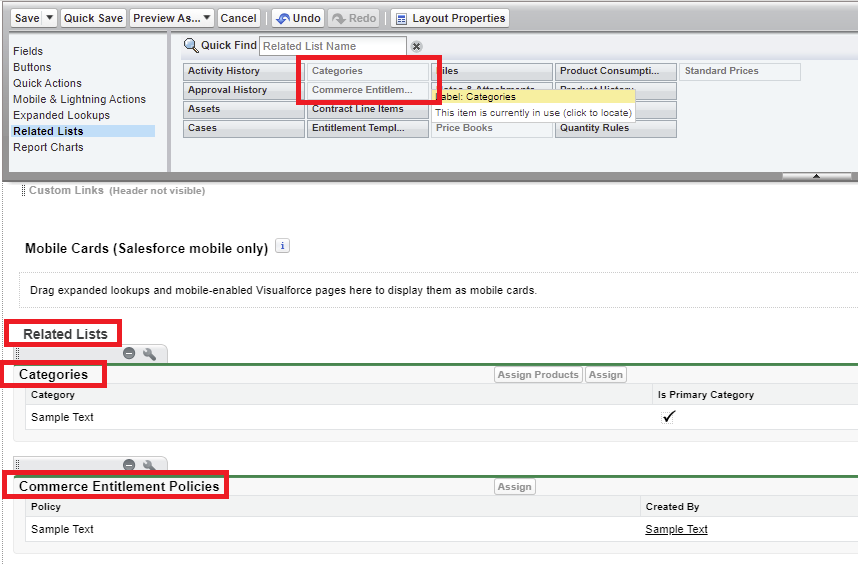
- Navigate to Setup → Object Manager → Product → Page Layouts → Product Layout.
- If Commerce Product Layout is available, select it as it is the default layout for System Administrators.
- From the Fields section, drag Product SKU into the Product Detail section.
- Select Related Lists from the layout editor menu.
- Drag the following related lists into the Related Lists section:
- Categories
- Commerce Entitlement Policies
- Click Save.
Update Order Summary Page Layout (Optional)
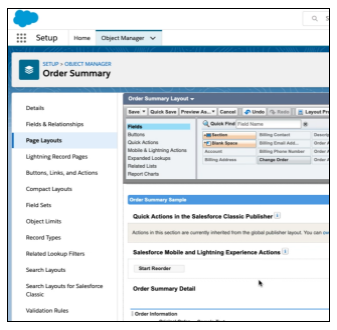
- Navigate to Setup → Object Manager → Order Summary → Page Layouts → Order Summary Layout.
- Scroll to the Salesforce Mobile and Lightning Experience Actions section.
- Click Override the Predefined Actions.
- Remove all actions except Start Reorder.
- Click Save.
Update Order Delivery Group Summary Layout
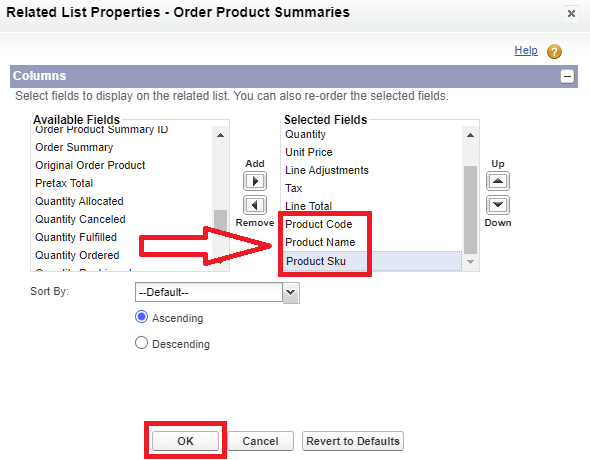
- Navigate to Setup → Object Manager → Order Delivery Group Summary → Page Layouts → Order Delivery Group Summary Layout.
- In the Order Product Summaries related list, click the Wrench icon.
- Add the following fields to the displayed columns:
- Product Code
- Product Name
- Product SKU
- Click OK, then Save.
Update Account Layout
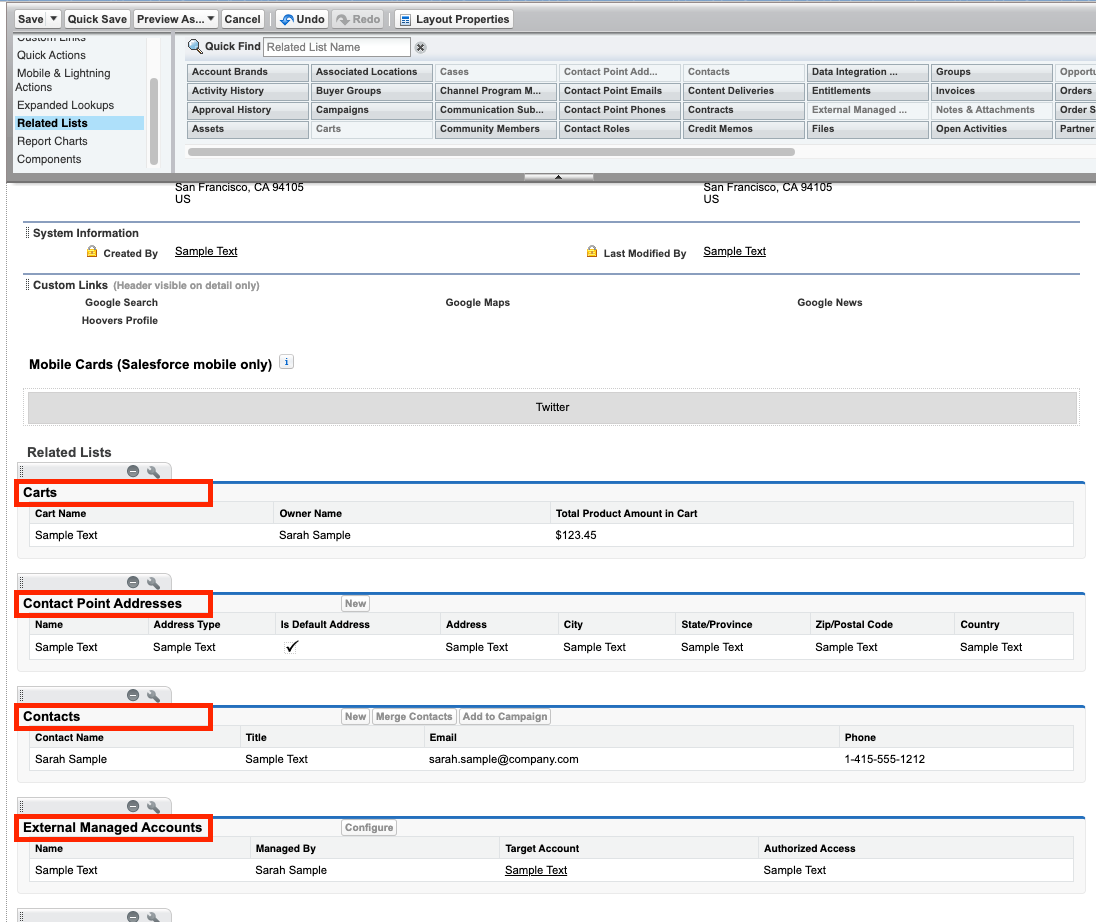
- Navigate to Setup → Object Manager → Account → Page Layouts → Account Layout.
- If available, select Commerce Account Layout.
- Scroll to Salesforce Mobile and Lightning Experience Actions.
- Click Override the Predefined Actions.
- Ensure the following actions are included:
- Enable as Buyer
- Disable as Buyer
- Select Related Lists from the layout editor menu.
- Add the following related lists if not already present:
- Carts
- Contact Point Addresses
- Contacts
- External Managed Accounts
- Click Save. When prompted, click Yes to overwrite related list customizations.
Update Contact Layout
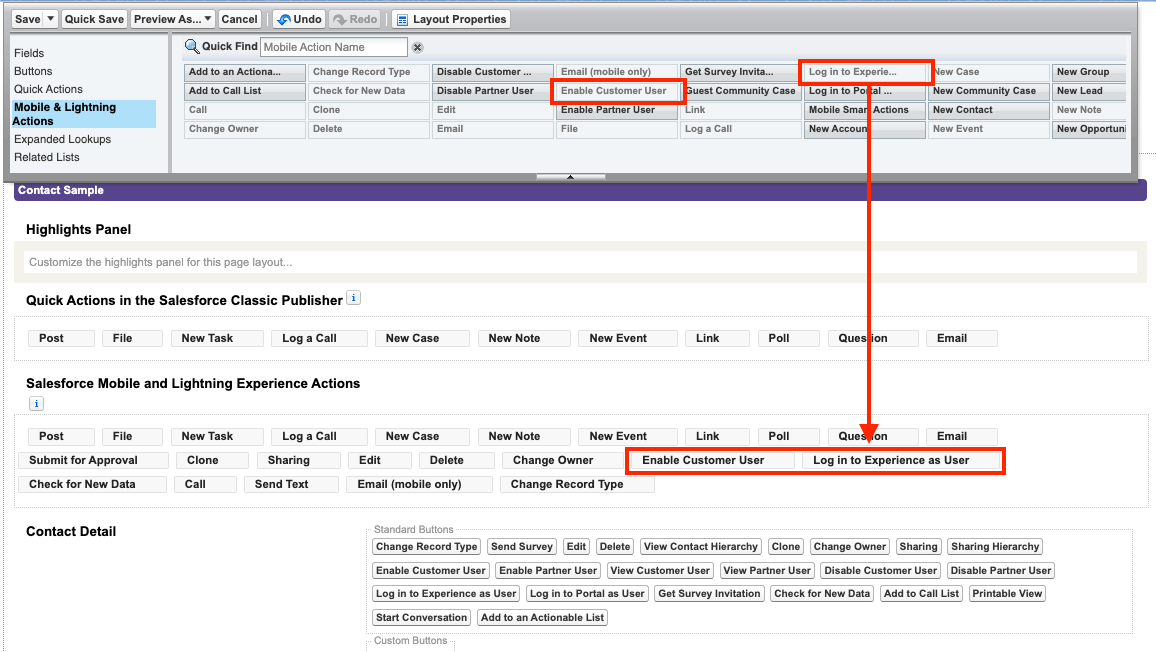
- Navigate to Setup → Object Manager → Contact → Page Layouts → Contact Layout.
- Scroll to the Salesforce Mobile and Lightning Experience Actions section.
- Click Override the Predefined Actions.
- Add the following actions:
- Enable Customer User
- Disable Customer User
- Log in to Experience as User
- Save the layout.
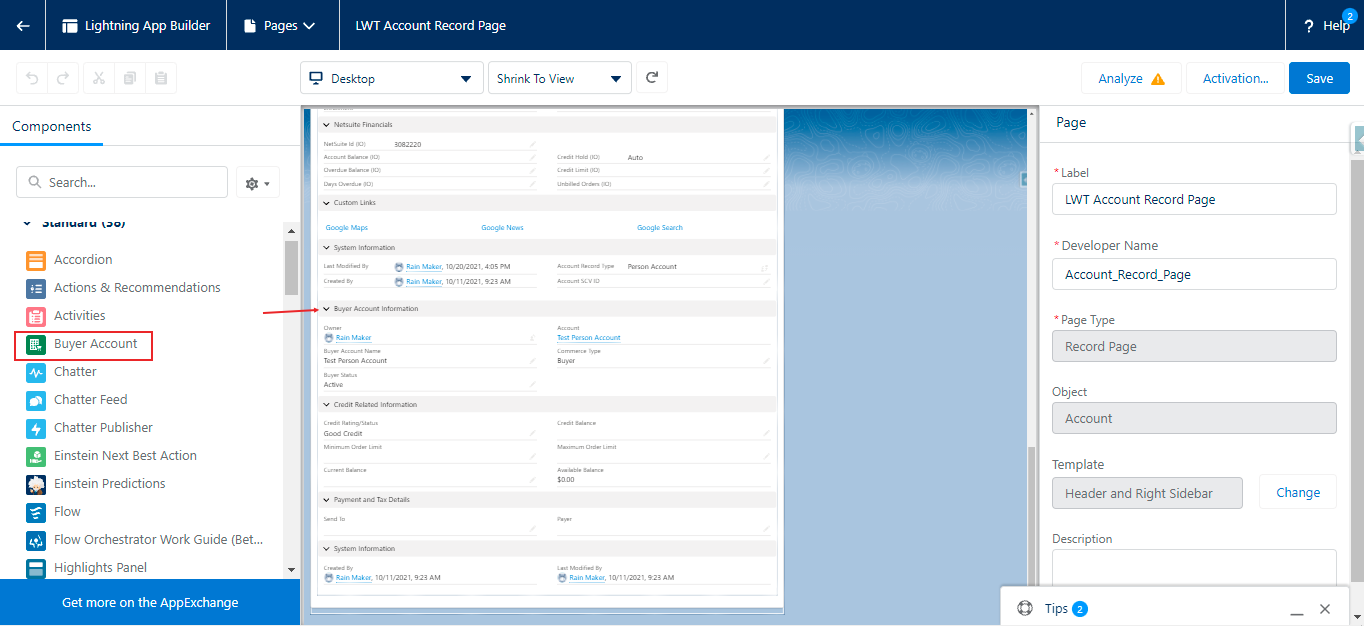
App Builder Settings — Account Record Detail Page
Choose any Account record and edit the page; in the detail page, drag and drop the Buyer Account component onto the page layout.
Step 7: Permission Sets for Buyers
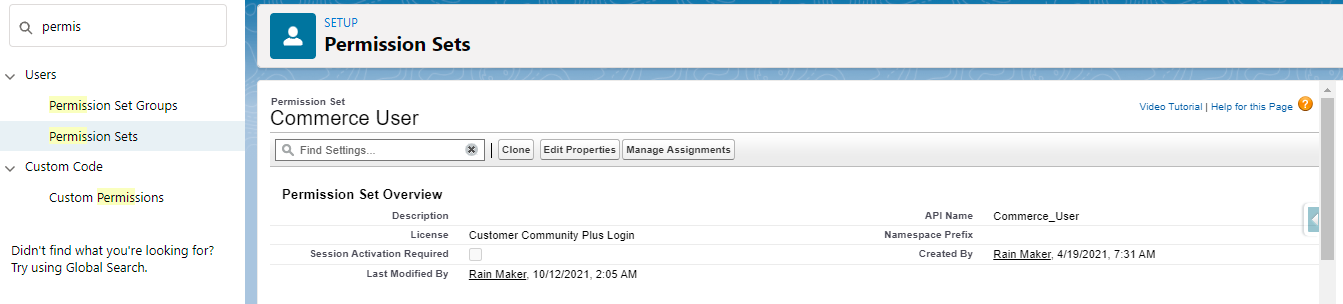
Create Permission Set
- Create a permission set named Commerce User and assign the Customer Community Plus license.
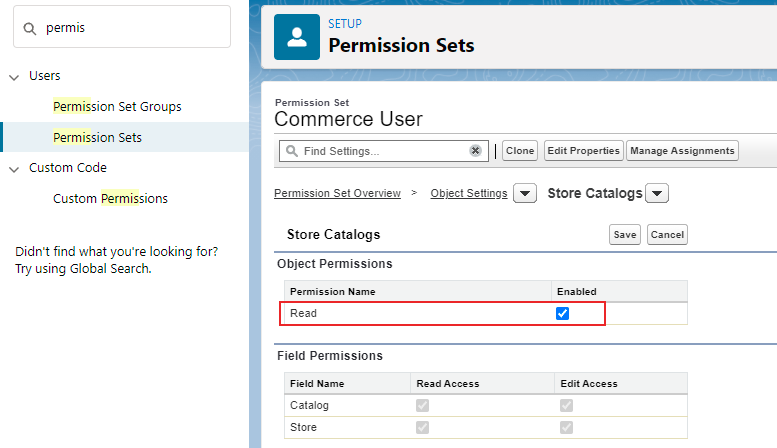
- Assign Read access to the following objects (Commerce User → Permission Set Overview → Object Settings → Account):
- Account
- Buyer Accounts
- Catalogs
- Categories
- Electronic Media Groups
- Locations
- Order Delivery Methods
- Order Summaries
- Price Books
- Products
- Product Category Products
- Stores
- Store Catalogs
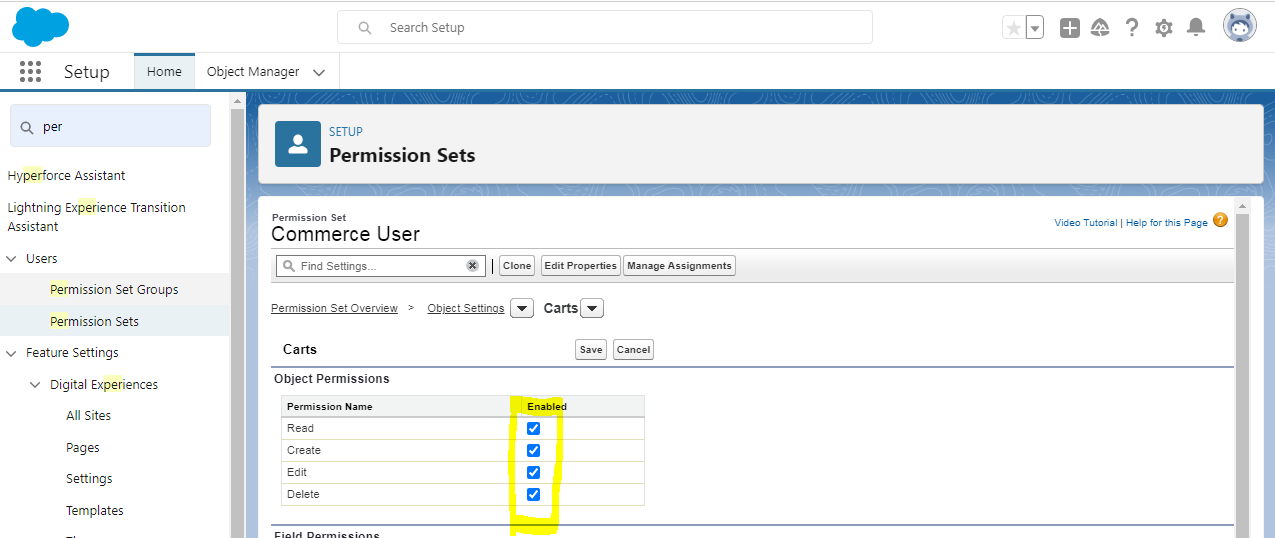
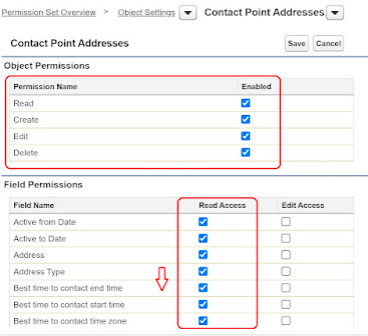
- Assign Create, Read, Update or Edit, Delete access to the following objects:
- Carts
- Contact Point Addresses
- Orders
- Wish Lists
- For the Contact Point Address object, assign Read permission to all fields.
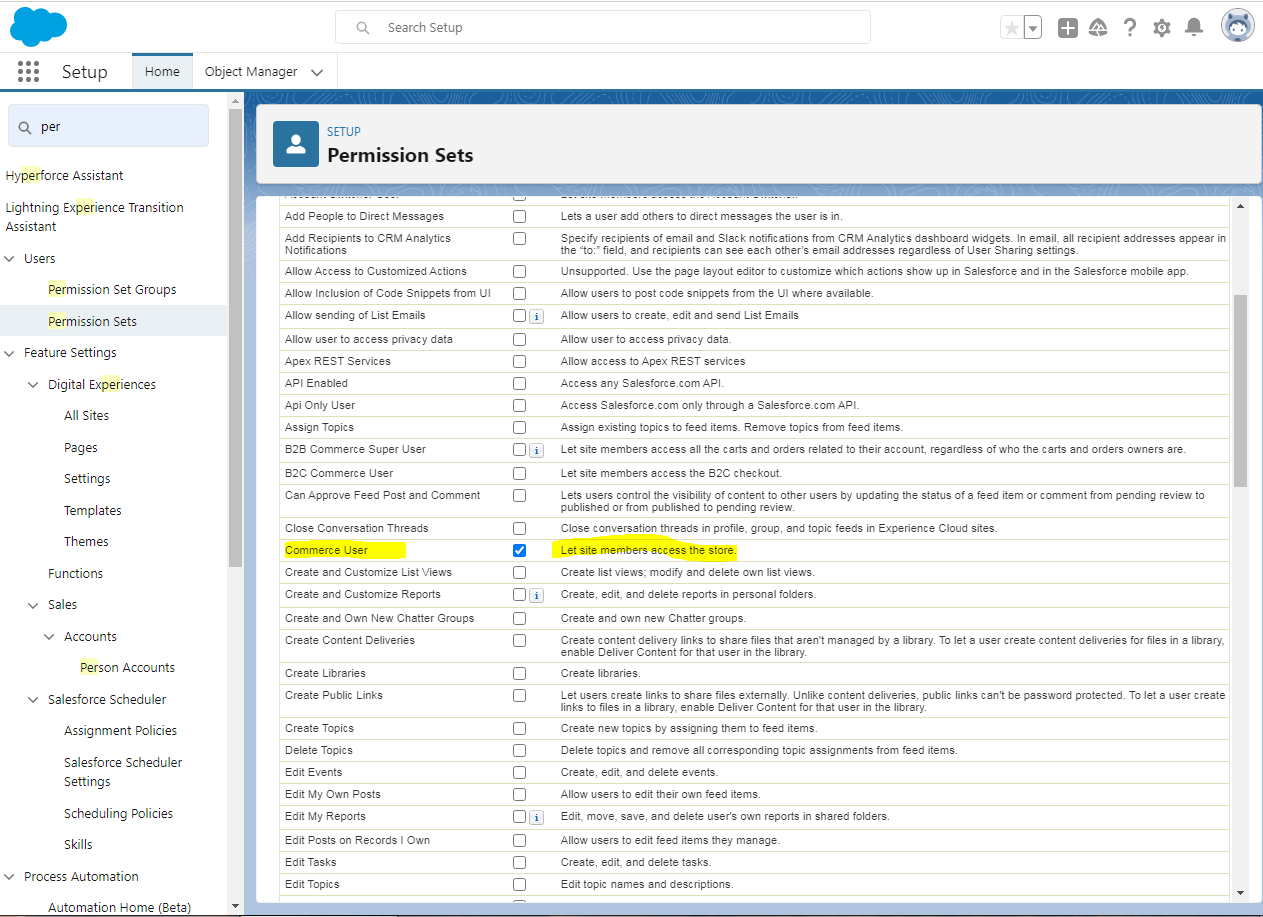
- Assign System Permissions — Commerce User.
Step 8: Install Commerce Reports
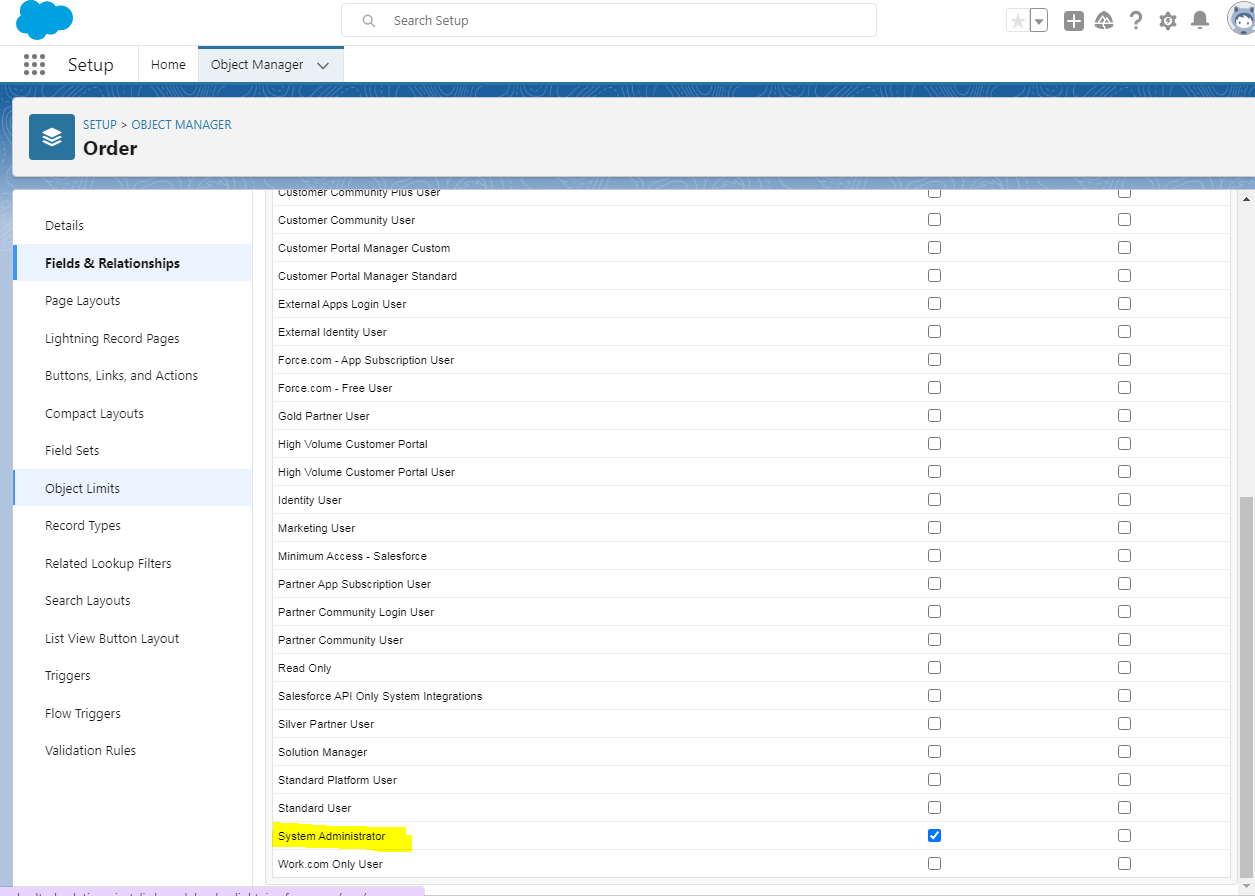
Install commerce reports to track Commerce orders. Set the field-level security for Orders, Sales Store.
- From the Object Manager, enter Order in the Quick Find Box.
- Select Order > Fields & Relationships > Sales Store.
- Click Set Field-Level Security.
- Make sure that Visible is selected for Customer Community Plus User and System Administrator.
Step 9: Configure Commerce Setup Assistant
- Navigate to Setup → Commerce Setup Assistant.
- Under Prepare Your Org for Salesforce Commerce, click Get Started.
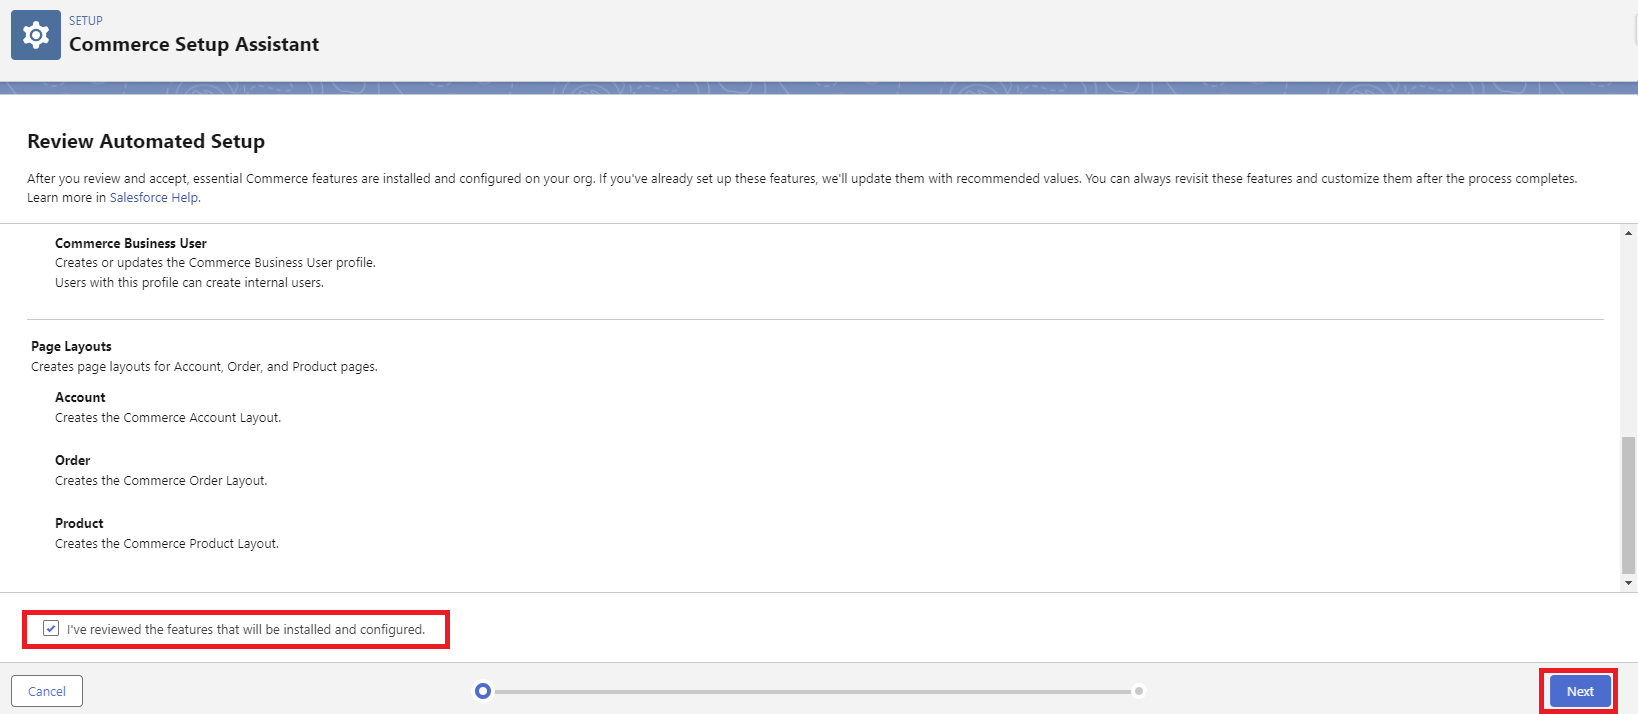
- Review the list of configurations that will be automatically applied.
- Select the checkbox: "I've reviewed the features that will be installed and configured".
- Click Next.
- Review the setup summary page.
- Click Complete Setup.
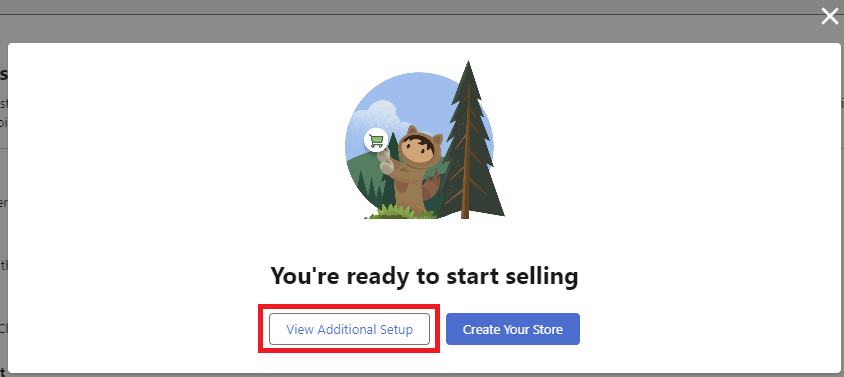
- After the setup finishes, open the Additional Setup tab.
- When prompted, click View Additional Steps.
- Locate the Dashboards and Reports section.
- Click Install Dashboards.
- Follow the installation wizard and complete all prompts.
- Wait until dashboard installation is completed successfully.
B2B Store Creation
Create Store
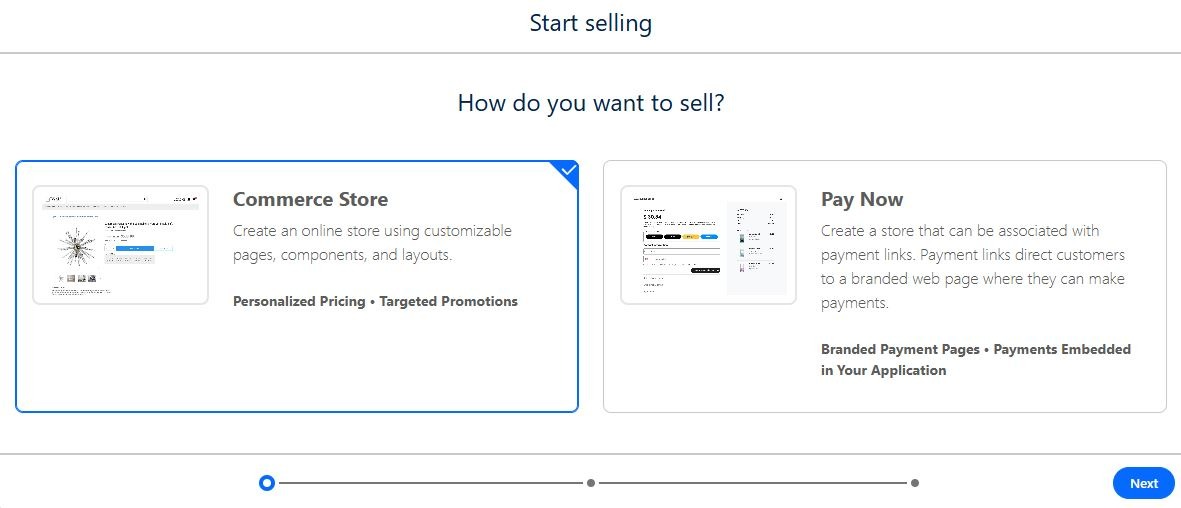
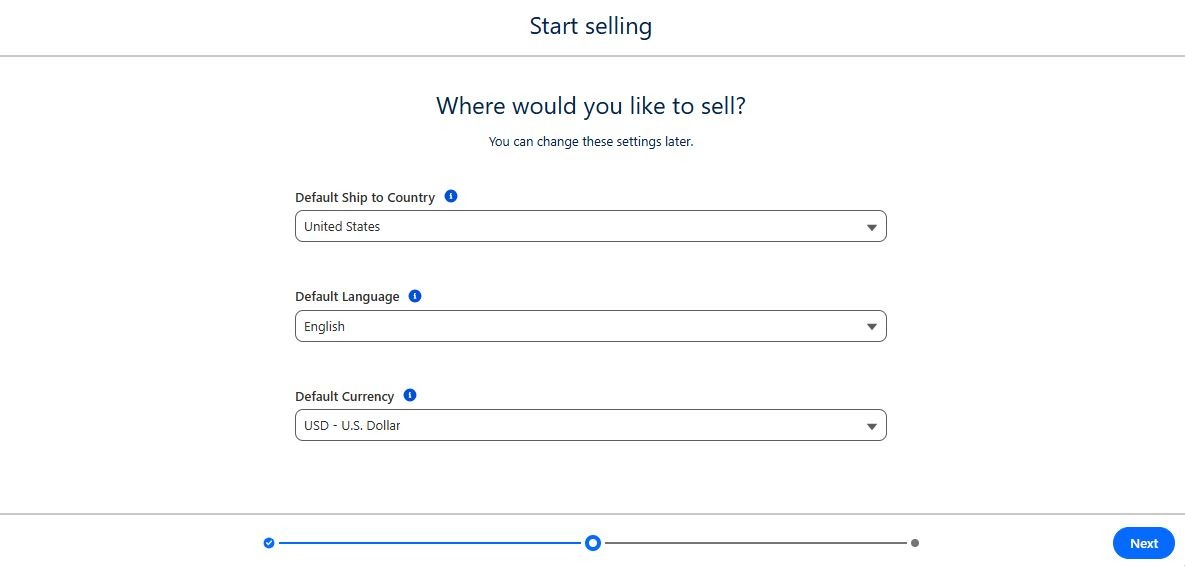
- Click on Commerce Store and click Next.
- Enter Default Ship to country, Default language, Default currency for the store.
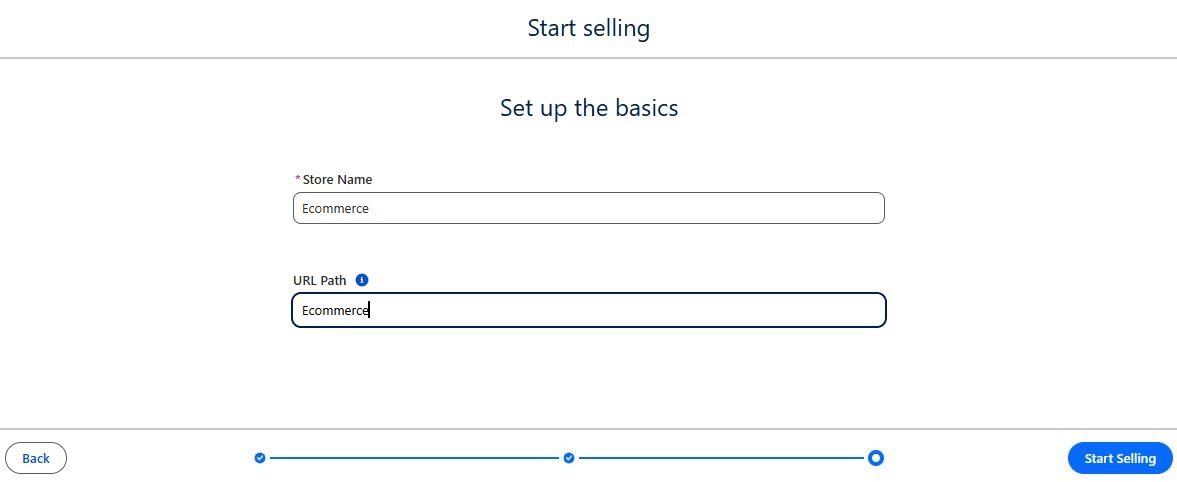
- Enter Store name and URL Name and click Start selling.
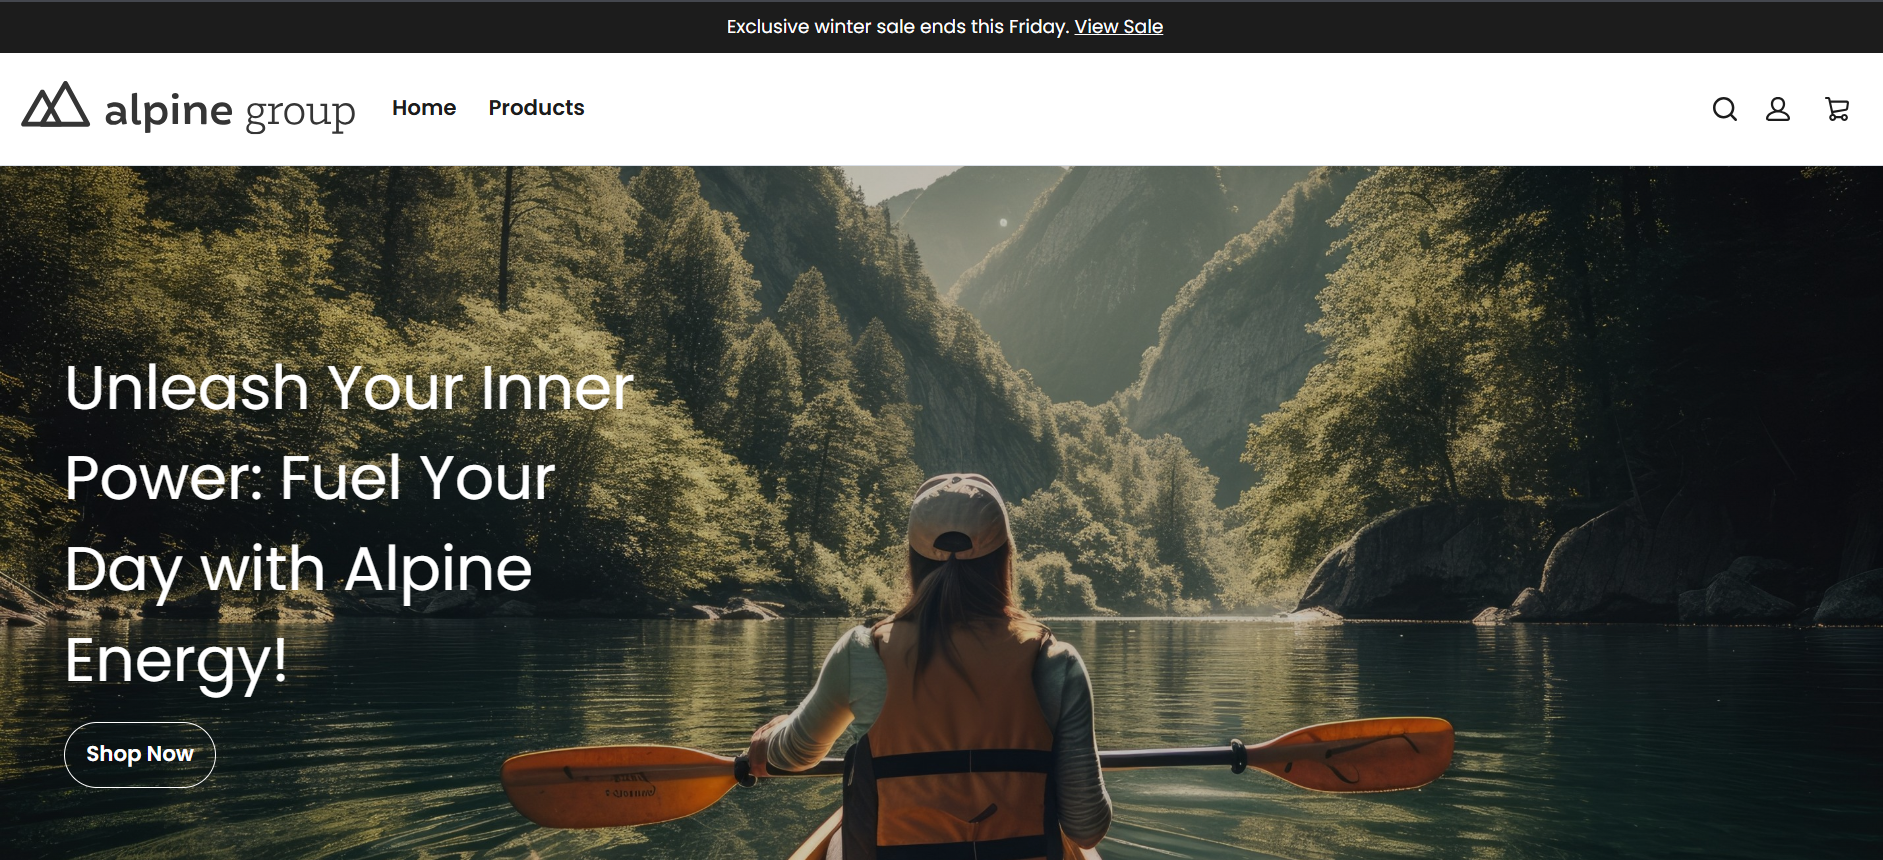
- The store is now created.
Configure Experience Site Access
Before configuring the storefront, ensure that the required profiles and permission sets are assigned to the Experience Cloud site.
Assign Profiles and Permission Sets
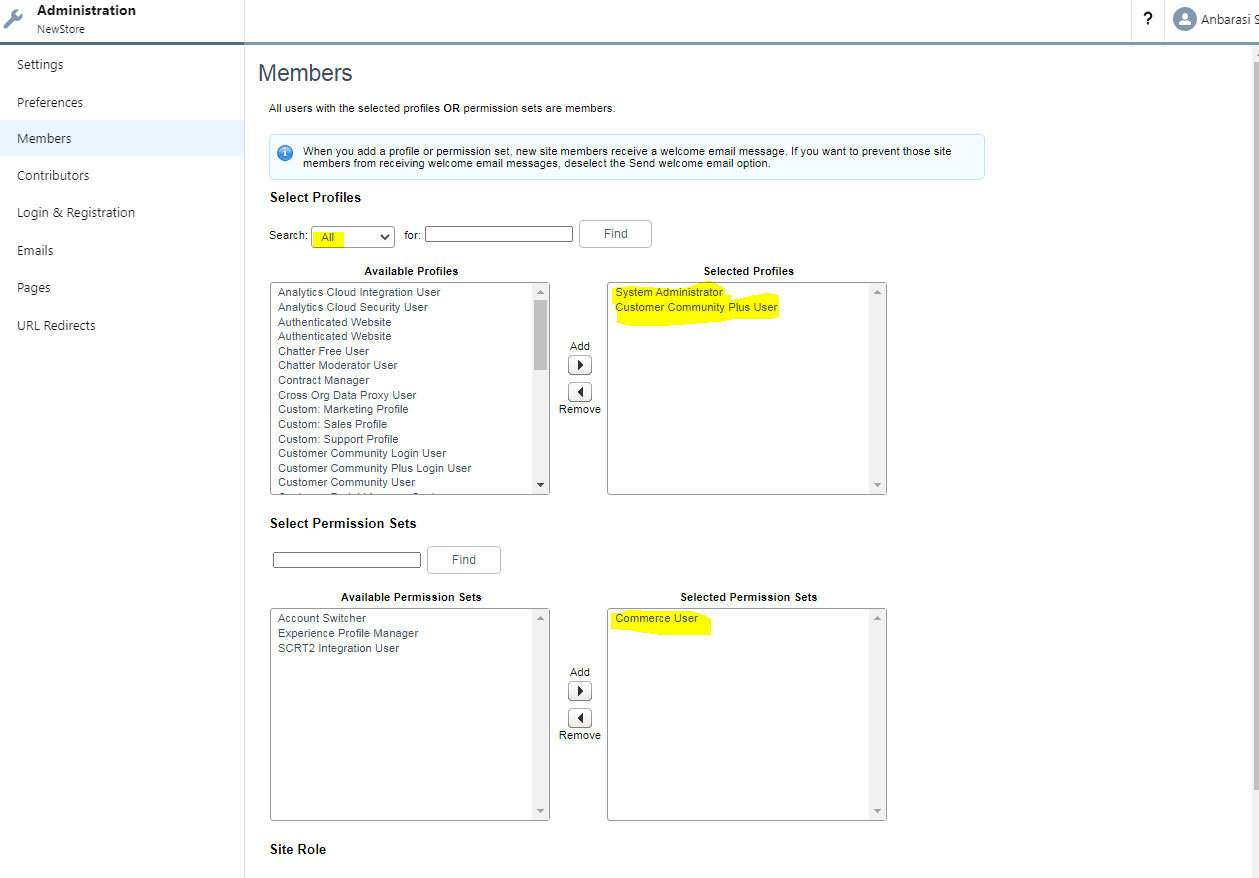
- Navigate to Experience Builder → Administration → Members.
- Under Profiles, add the following:
- System Administrator
- Customer Community Plus User
- Under Permission Sets, add: Commerce User.
- Save the configuration.
Configure Content Security Policy
- Navigate to Experience Builder → Settings → Security & Privacy.
- Locate the Content Security Policy (CSP) section.
- Enable: Relaxed CSP — Permit Access to Inline Scripts and Allowed Hosts.
- Save the change.
Create a CMS Workspace
CMS Workspace is used to manage images, banners, and other digital assets displayed in the storefront.
Create Workspace
- Navigate to Store → Content Management.
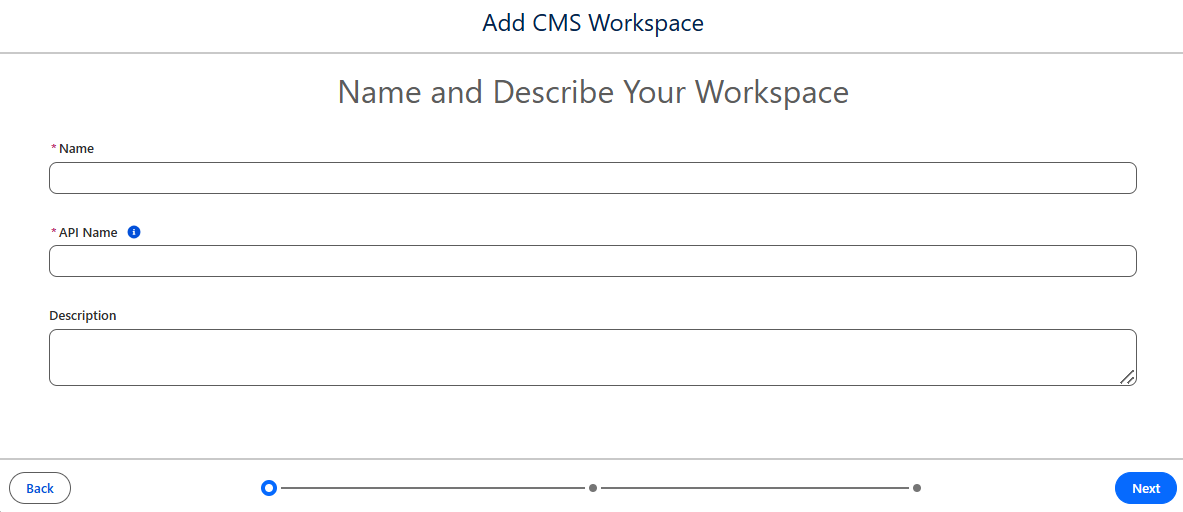
- Click Add Workspace.
- Enter a workspace name.
- Select Enhanced CMS Workspace.
- Click Next.
Create Channel
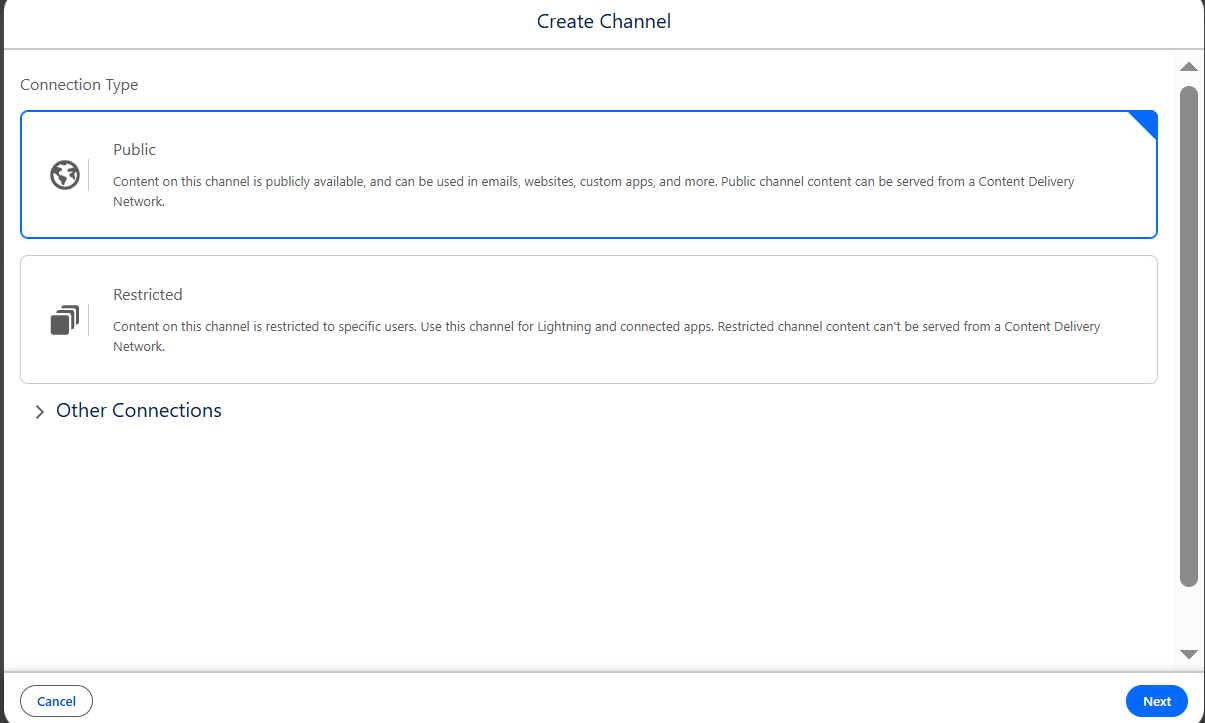
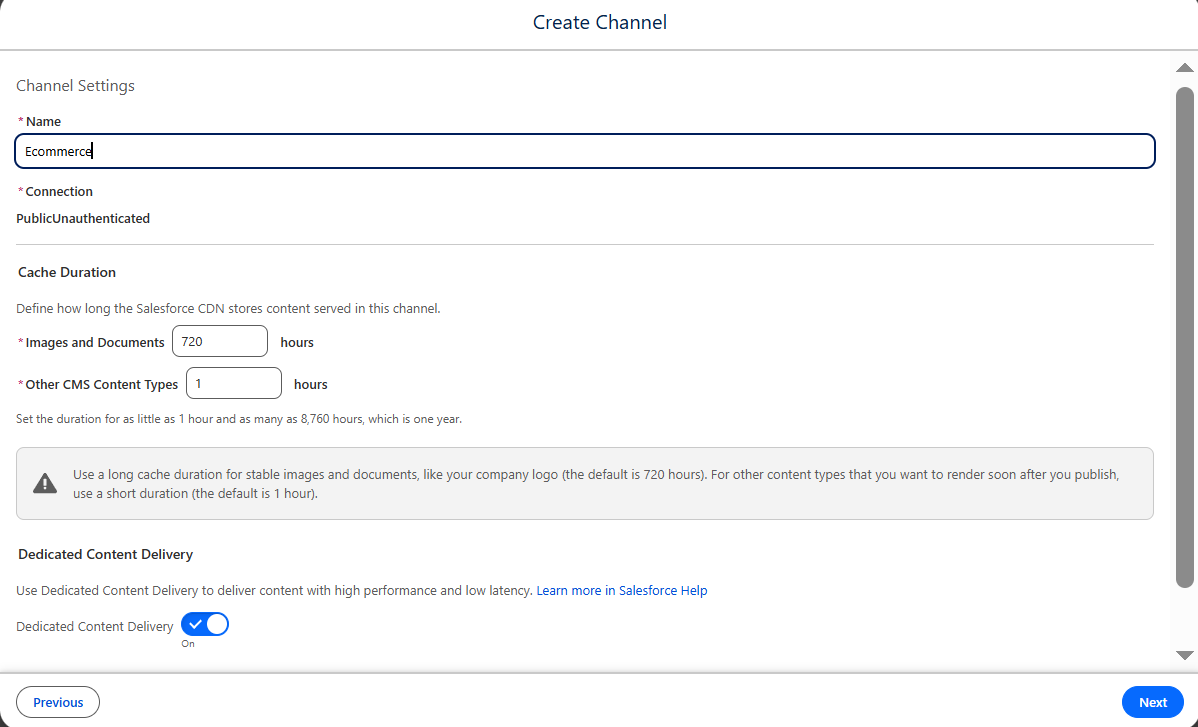
- Click Create Channel.
- Select Public Channel.
- Enter a channel name.
- Click Next, then Done.
Add Contributors
- Select the newly created channel.
- Click Next.
- Add the following users:
- Integration User
- Security User
- Click Next.
Assign Contributor Roles
- Assign the Content Manager role for both users.
- Click Next.
Configure Language
- Select English (United States) as the default language.
- Click Next.
- Review the configuration.
- Click Done.
Create Content
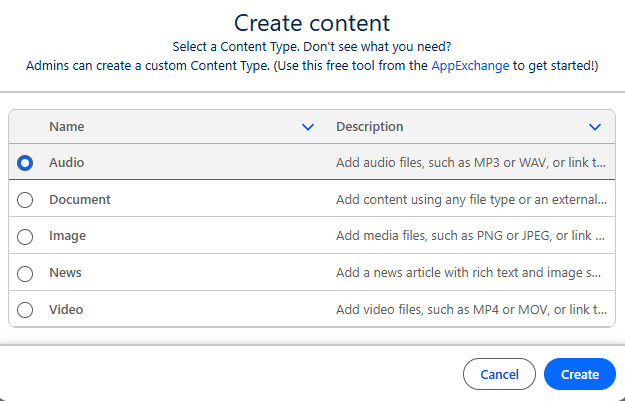
- Click Create Content.
- Select Image.
- Upload the image.
- Save the content.
- Publish the content.
Create Products
Products represent items available for purchase within the storefront.
- Navigate to Product Workspace.
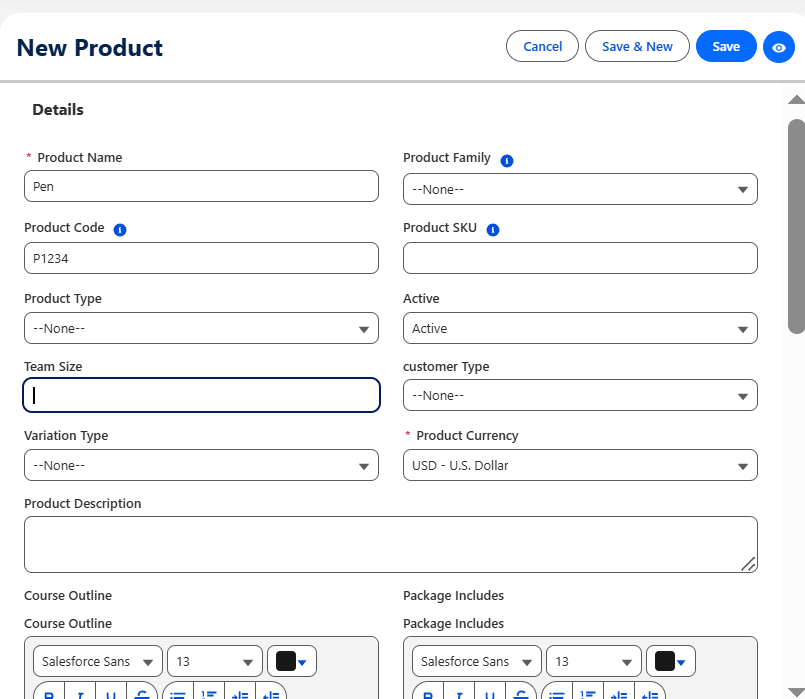
- Click New Product.
- Enter product details.
- Add product media using the CMS Workspace.
- Click Save.
Create Price Books
Price Books store product pricing information.
Create Price Book
- Navigate to Pricing Workspace.
- Click New.
- Enter Price Book Name and Description.
- Save the record.
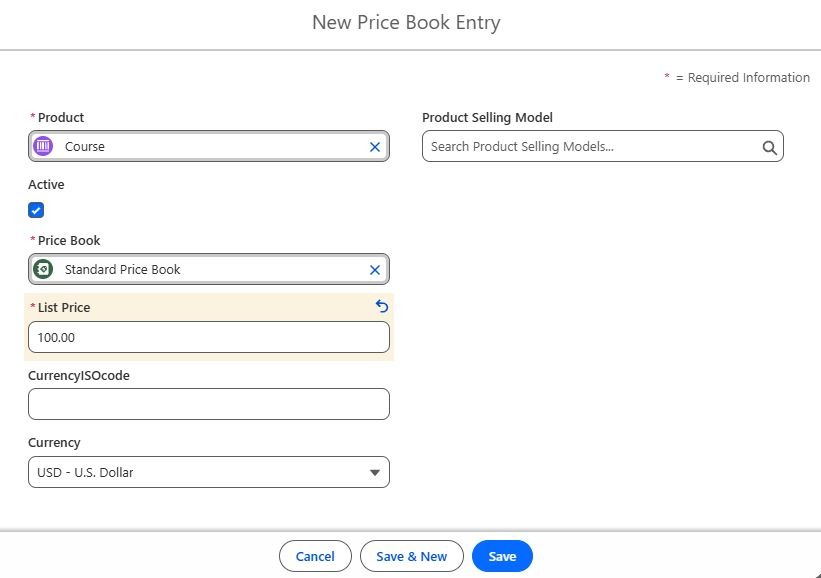
Create Price Book Entries
- Open the created Price Book.
- Add products.
- Specify pricing information.
- Save the entries.
Configure Catalogs and Categories
Catalogs organize products for storefront display.
Create Catalog
- Open the Commerce App.
- Navigate to Catalogs.
- Create a new catalog if required.
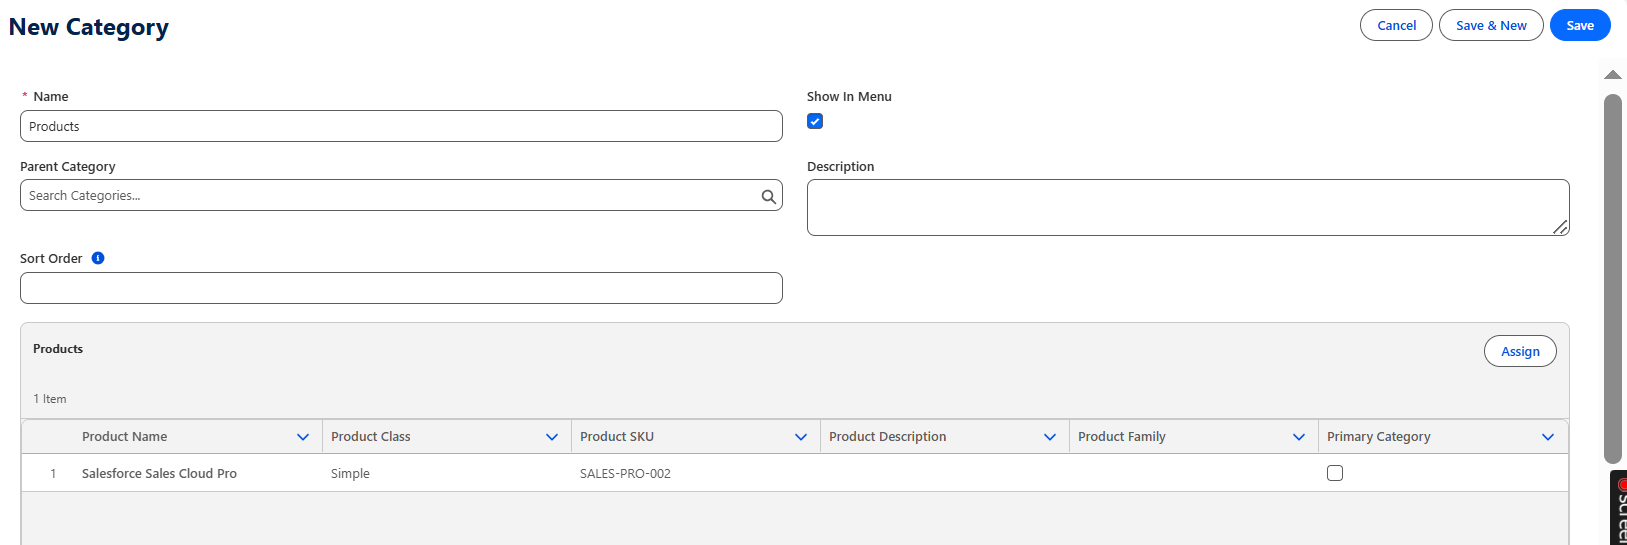
Create Category
- Open the Catalog.
- Click New Category.
- Enter category details.
- Save the record.
Assign Products to Categories
- Open the Category.
- Navigate to the Products related list.
- Click Assign Products.
- Select the required products.
- Complete the assignment wizard.
- Save.
Configure Buyer Groups
Buyer Groups determine which products and pricing are available to specific customers.
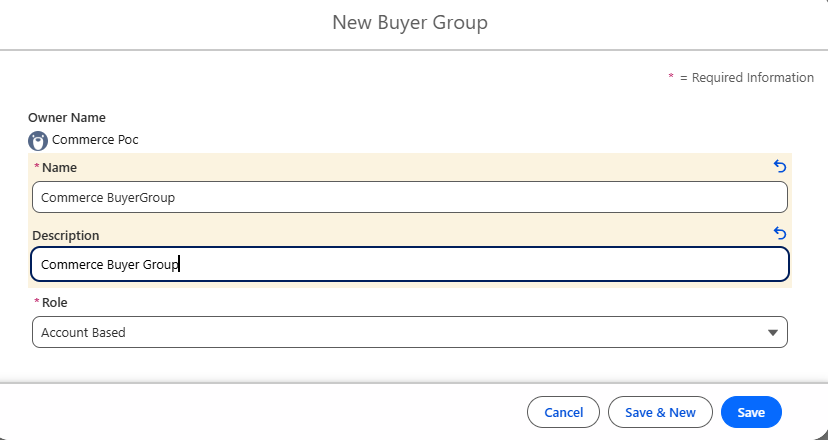
Create Buyer Group
- Navigate to Buyer Groups.
- Click New.
- Enter Buyer Group details.
- Save the record.
Configure Related Records
Add the following related records:
- Price Books
- Entitlement Policies
- Stores
- Buyer Members
Configure Entitlement Policies
Entitlement Policies control product visibility and purchasing permissions.
Create Entitlement Policy
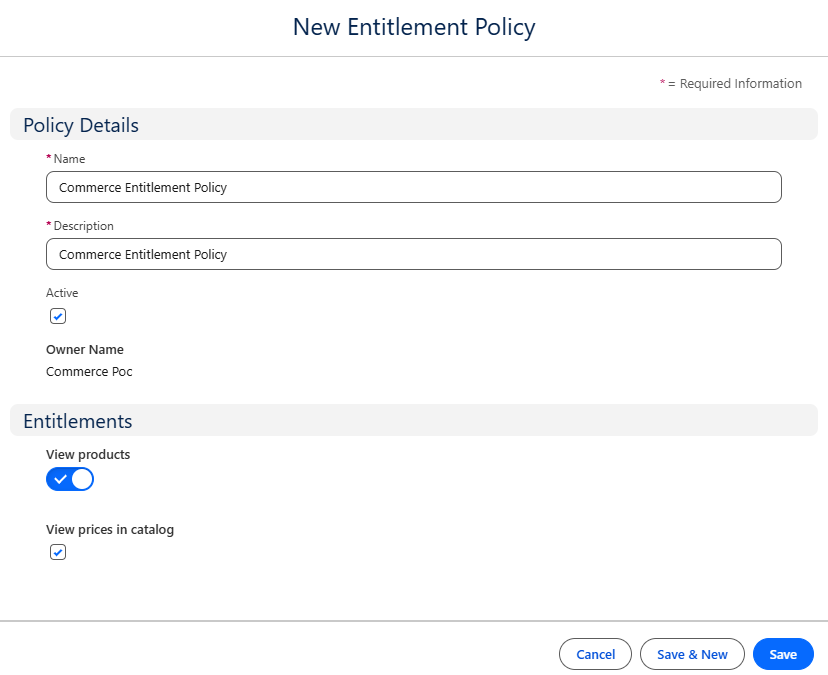
- Navigate to Entitlement Policies.
- Click New.
- Enter policy details.
- Save.
Assign Related Records
Add:
- Products
- Buyer Groups
Save the changes.
Configure Buyer Account and Contact Access
Create Buyer Account
- Create a new Account.
- Enter Account Name: Test Account.
- Save the Account.
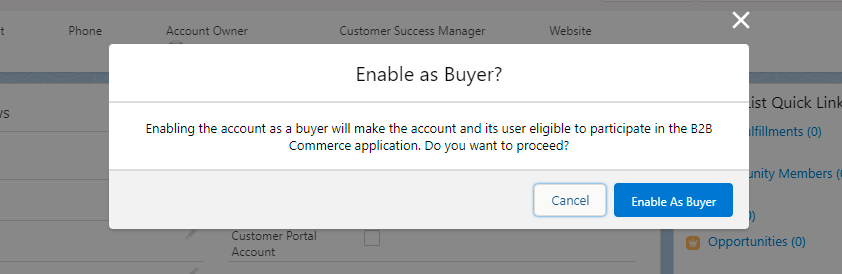
- Click Enable as Buyer.
Create Contact
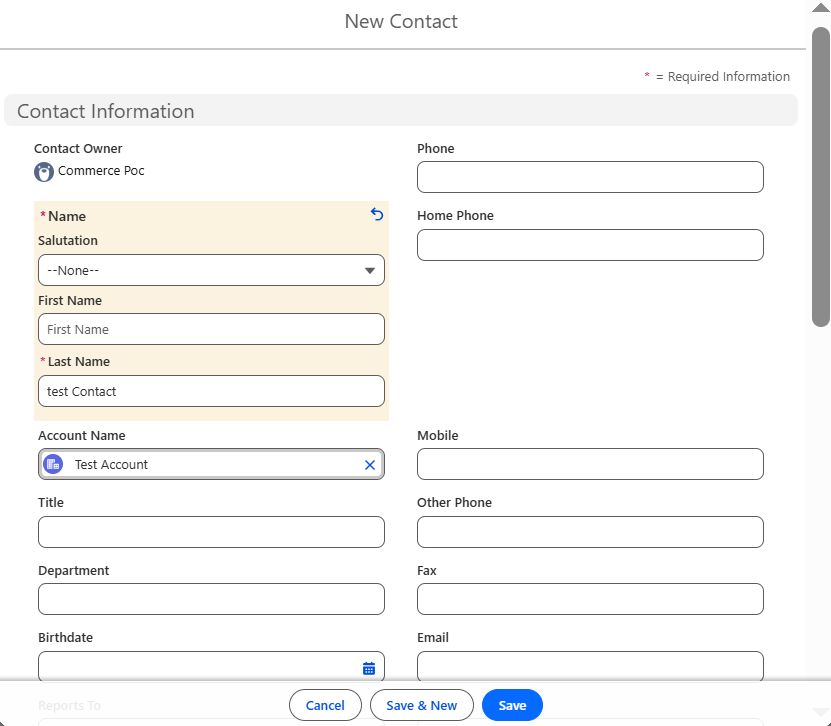
- Open Test Account.
- Create a new Contact.
- Save the Contact.
Enable Customer User
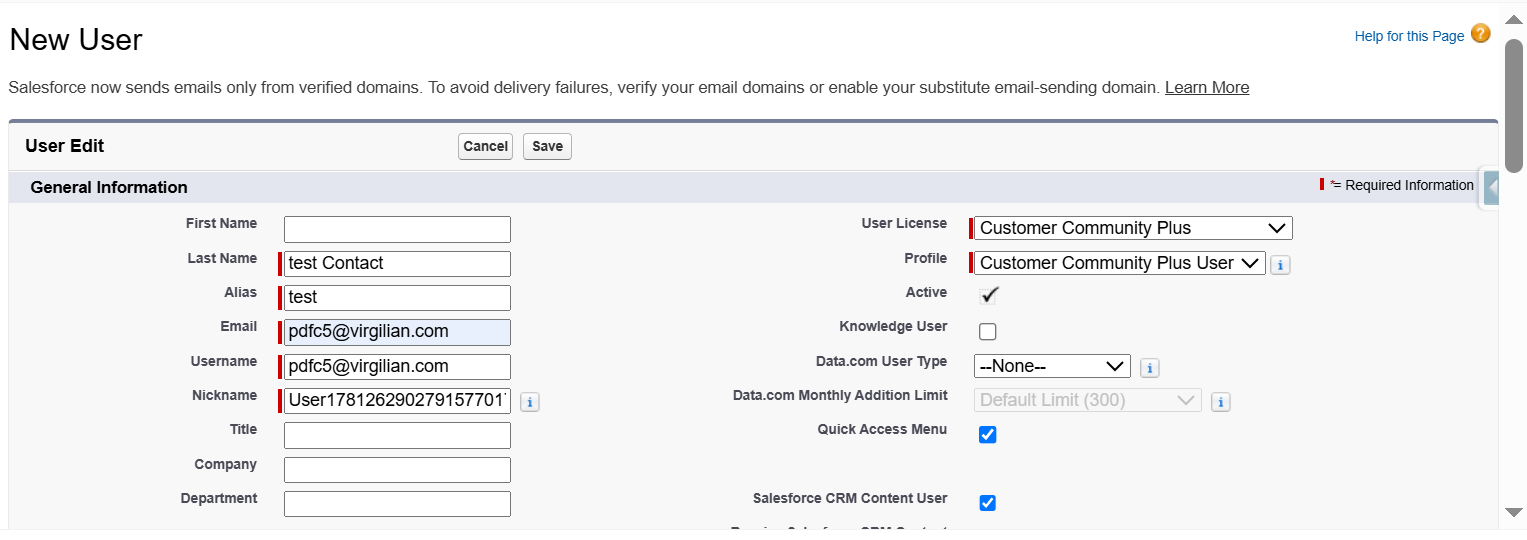
- Open the Contact record.
- Click Enable Customer User.
- Salesforce automatically opens User creation.
- Select Profile as Customer Community Plus User.
- Save the User record.
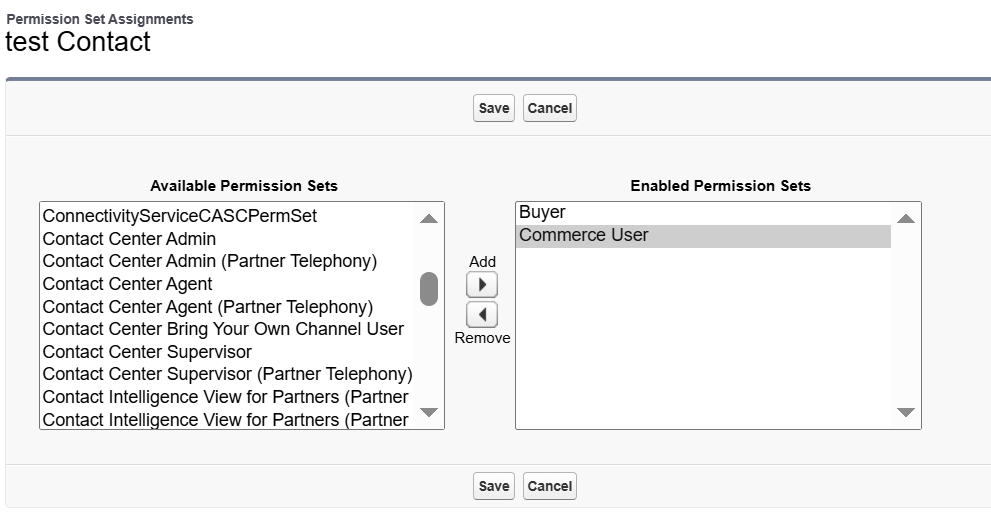
Assign Permission Sets
Assign Buyer and Commerce User permission sets to the user.
Verify Login
- Open the Contact record.
- Click Log in to Experience as User.
- Verify storefront access.
Register Reference Implementation Classes
Reference classes are required to support sample checkout integrations.
Required Apex Classes
Deploy the following classes from the b2b-commerce-on-lightning-quickstart repository:
- B2BDeliverySample
- B2BCheckInventorySample
- B2BTaxSample
- B2BPricingSample
Configure Remote Site Setting
Create a Remote Site Setting for: https://b2b-commerce-test.herokuapp.com
Register Services
- Verify your API Version.
- Open Developer Console.
- Execute the registration script provided in Salesforce documentation.
- Confirm successful registration.
Configure B2B Checkout
Enable State and Country Picklists
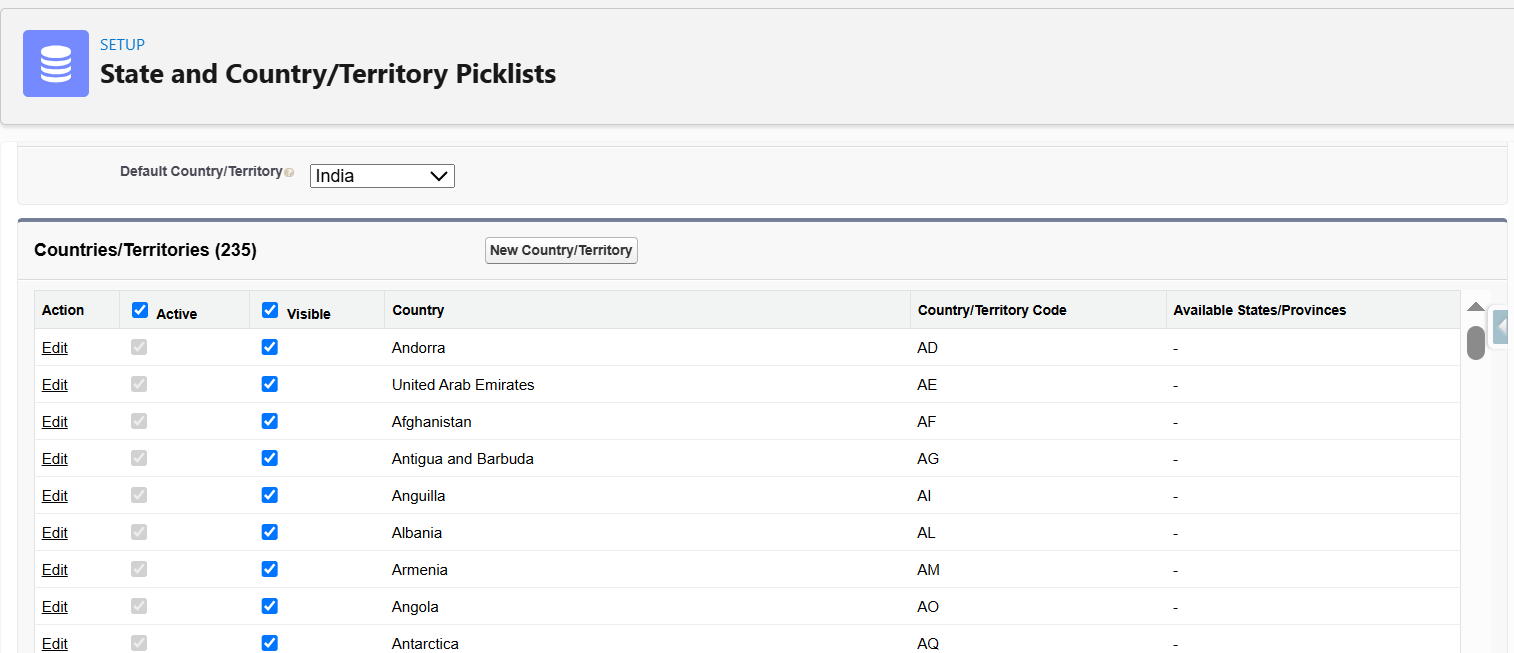
- Navigate to Setup → State and Country/Territory Picklists.
- Select Configure States, Countries, and Territories.
- Set Default Country: India.
- Enable: Active, Visible.
- Save.
Configure States
- Open India.
- Enable all required states.
- Save.
Convert Existing Data
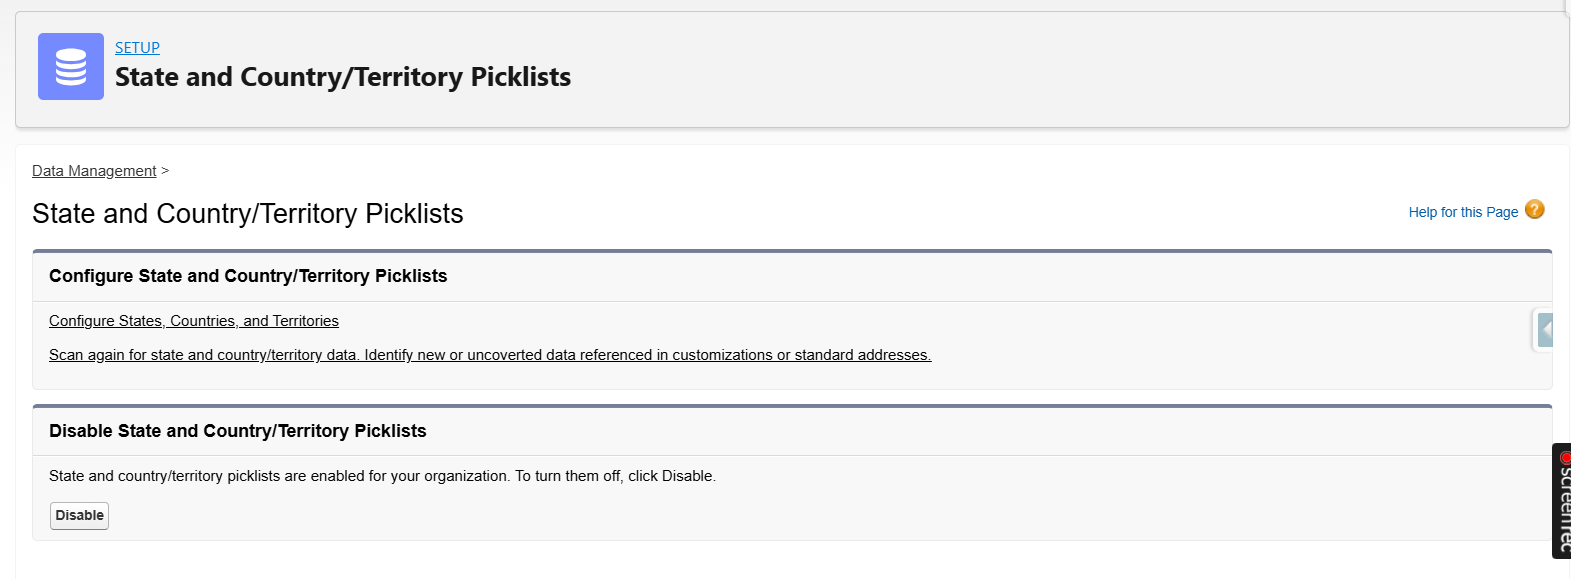
- Run Scan for State and Country/Territory Data.
- Convert identified values.
- Map existing Country values to India.
- Map State values to Tamil Nadu or the appropriate state.
- Complete the conversion wizard.
- Enable State and Country/Territory Picklists.
Resolve Common Checkout Errors
| Error | Resolution |
|---|---|
| "We can't proceed with checkout because there's no saved shipping address and you don't have the necessary buyer permissions to add one." | Verify the following: Shipping Address exists on the Account; Billing Address exists on the Account; Buyer Permission Set is assigned; Store Inventory is not incorrectly linked; Default Country and State values are configured in Store Localization settings. |
Configure B2C Guest User Access
Enable Guest Access
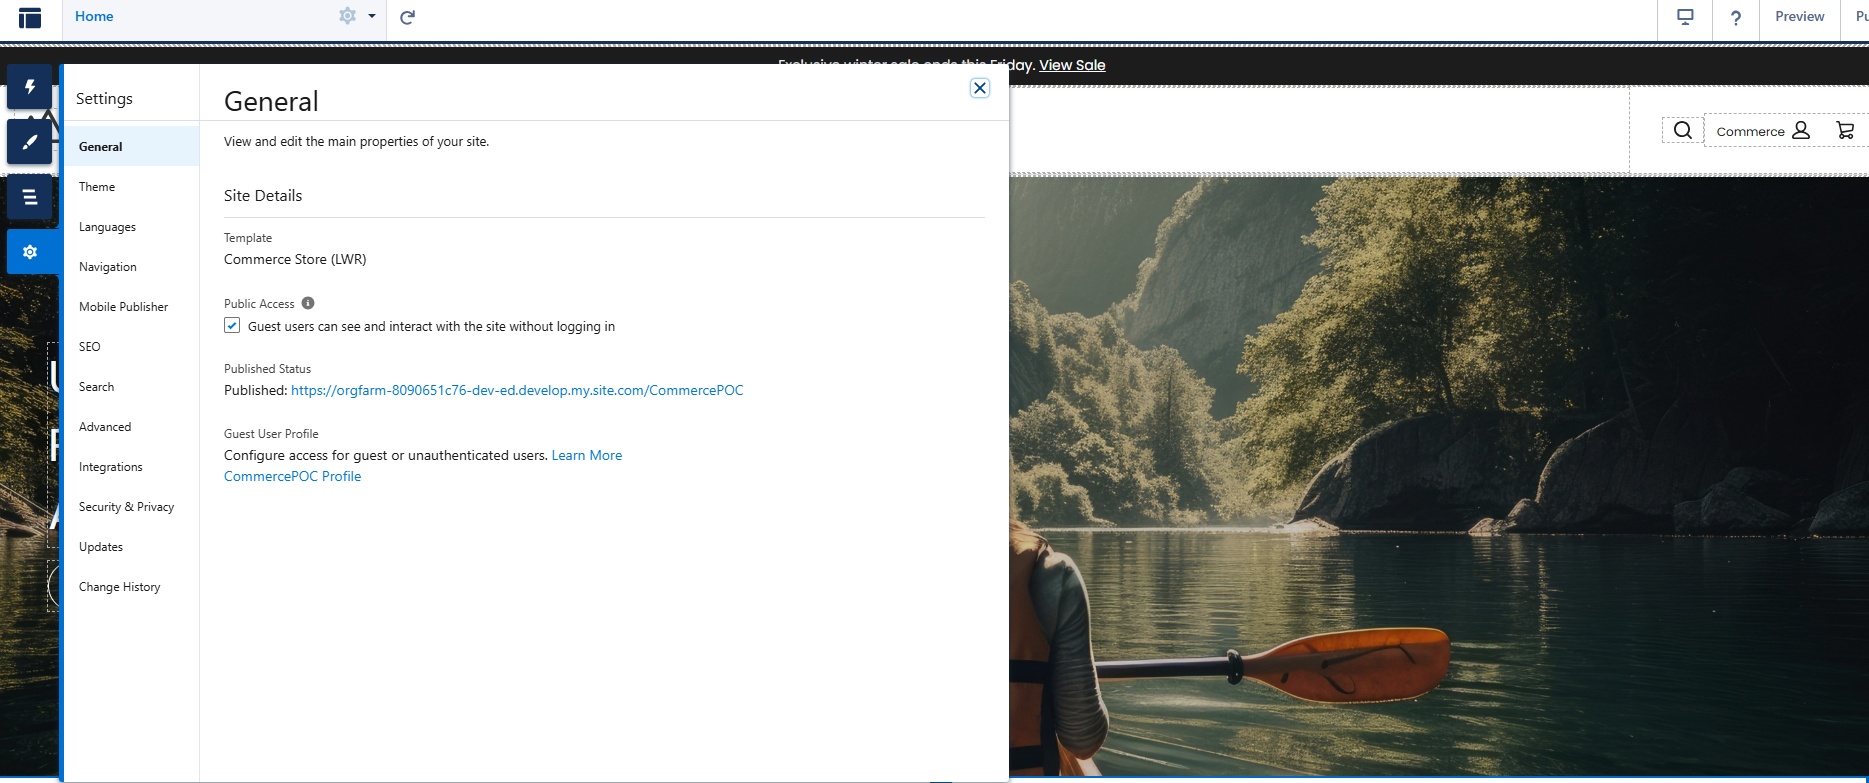
- Open Experience Builder.
- Navigate to Settings → General.
- Enable: Guest users can see and interact with the site without logging in.
- Save.
Advantages
- Provides a centralized platform for managing B2B commerce operations.
- Supports personalized product visibility through Buyer Groups and Entitlement Policies.
- Enables seamless product, pricing, and catalog management.
- Integrates with Salesforce CRM data for a unified customer experience.
- Supports both authenticated buyers and guest users.
- Scalable architecture suitable for small and large commerce implementations.
- CMS integration allows easy management of storefront content and media.
Limitations
- Initial configuration involves multiple setup steps and dependencies.
- Proper permission and access management are critical to avoid checkout and visibility issues.
- Advanced checkout customization may require Apex development and service integrations.
- Large implementations may require additional planning for performance and governance.
Conclusion
The storefront is now configured with products, catalogs, pricing, buyer access, checkout services, CMS content, and guest user capabilities, enabling a complete B2B Commerce purchasing experience. The Salesforce B2B Commerce implementation provides a complete digital commerce solution that enables organizations to efficiently manage products, catalogs, pricing, buyer access, and online purchasing experiences. By configuring Experience Cloud, CMS Workspaces, Products, Price Books, Catalogs, Categories, Buyer Groups, Entitlement Policies, and Checkout Services, businesses can create a scalable and secure storefront for their customers.
The setup also ensures that buyers have appropriate access through permission sets and buyer groups, while administrators can control product visibility and pricing using entitlement policies and catalogs. Additional configurations such as CMS content management, guest user access, and checkout service integration further enhance the overall shopping experience.